


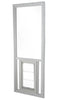
Utah Pet Access French Door Glass Insert
Extreme Performance Seamlessly Installed

Fast & Free Shipping in the USA.
Custom Built for Your Home - Not Eligible for Return
Installation & Fit
Installation & Fit
Best Suited For
Best Suited For
Questions
Questions
What's in the box?
- Glass insert Kit with Endura Flap Pet Door
- Screw Plugs
What is the Utah Pet Access French Door Glass Insert?
Will this work with my French doors?
How do I choose the correct size?
Explore all questionsSize & Measurement Guide
Refund policy
We have a 90-day return policy, which means you have 90 days after receiving your item to request a return.
To be eligible for a return, your item must in new, resellable condition. Pet doors that have been installed are not eligible for return. Custom orders are final sale and not eligible for return.
To start a return, you can contact us at customerservice@enduraflap.com. Please note that returns will need to be sent to the following address: 254 Granada Drive, San Luis Obispo CA 93401
If your return is accepted, we’ll send you a return shipping label, as well as instructions on how and where to send your package. Items sent back to us without first requesting a return will not be accepted.
You can always contact us for any return question at customerservice@enduraflap.com.
Damages and issues
Please inspect your order upon reception and contact us within 7 business days if the item is defective, damaged or if you receive the wrong item, so that we can evaluate the issue and make it right.
Exceptions / non-returnable items
Custom products are final sale and not eligible for return.
Exchanges
We do not offer exchanges. The fastest way to ensure you get what you want is to return the item you have, and once the return is accepted, make a separate purchase for the new item.
European Union 14 day cooling off period
Notwithstanding the above, if the merchandise is being shipped into the European Union, you have the right to cancel or return your order within 14 days, for any reason and without a justification. As above, your item must be in the same condition that you received it. You’ll also need the receipt or proof of purchase.
Refunds
We will notify you once we’ve received and inspected your return, and let you know if the refund was approved or not. If approved, you’ll be automatically refunded on your original payment method within 10 business days. Please remember it can take some time for your bank or credit card company to process and post the refund too.
If more than 15 business days have passed since we’ve approved your return, please contact us at customerservice@enduraflap.com.
After 90 Day Rules for Endura Flap Products:
- After 90 days, Items that are returned have a 15% restocking fee.
- After 120 days, Items that are returned have a 20% restocking fee.
- After 150 days, Items that are returned have a 35% restocking fee.
- Items cannot be accepted after 365 days.
Time frames begin the day that you receive your order.
Do you charge shipping for returns? We will send you a label for all returns in the US, but the return label is not free and is charged to your account. We do not refund any of the original shipping charges initially paid on the order.
If you are not satisfied with your purchase for any reason, and need to return pet door products please email customerservice@enduraflap.com or call (800) 826-2871 to submit a return request for a Return Merchandise Authorization (RMA) number within 90 days of receipt. To receive a refund of the merchandise cost the return item must be in original, resalable condition within 90 days of receipt for a full refund on the product cost.
When shipping returns back please make sure to package them properly to prevent damage. The provided return label will have the proper return address on it. All refunds will amount to the cost of the item, including taxes if applicable. We do not refund paid shipping. We process returns daily with the exception of weekends and holidays.

Utah Pet Access French Door Glass Insert

 Product Details
 Product Details
Product Details
This is what a truly integrated pet door looks like. Instead of cutting into your door or adding a panel, the entire glass unit is replaced with a single, purpose-built insert that includes the pet door from the start. The result is a clean, built-in appearance that feels like it was always part of your home.
Seamless Built-In Design
The glass itself is safety-tempered and shatter-resistant, offering strength and reliability while maintaining the look and function of your original French doors. Because the frame and locking system remain untouched, you keep the security and integrity of your existing setup.
At the center of the insert is the Endura Flap, engineered to perform in demanding conditions. The material stays flexible in extreme cold and holds its shape in heat, while the magnetic seal helps the flap return into place after each use. This reduces airflow and improves overall insulation without requiring constant adjustment.
Engineered for Extreme Conditions
This configuration is especially valuable in exposed environments where wind and temperature swings can impact comfort. The sealed design, combined with optional Low-E glass, helps stabilize indoor conditions while still giving your pet the freedom to move in and out independently.
Because the insert is built as a single unit, installation is more about proper fit than assembly. Once installed, it functions as a permanent upgrade that blends into your home while delivering long-term performance.
Size Chart
| Outside Frame Dimension | Pet Door Size | Flap Dimension | Rough Cut Out | Visible Daylight |
|---|---|---|---|---|
| 22" x 66" | Medium | 8" w x 15" h | 21" x 65" | 19" x 63" |
| Large | 10" w x 19" h | |||
| Extra Large | 12" w x 23" h | |||
| 24" x 66" | Medium | 8" w x 15" h | 23" x 65" | 21" x 63" |
| Large | 10" w x 19" h | |||
| Extra Large | 12" w x 23" h | |||
| 22" x 82" | Medium | 8" w x 15" h | 21" x 81" | 19" x 79" |
| Large | 10" w x 19" h | |||
| Extra Large | 12" w x 23" h | |||
| 24" x 82" | Medium | 8" w x 15" h | 23" x 81" | 21" x 79" |
| Large | 10" w x 19" h | |||
| Extra Large | 12" w x 23" h |
Installation Information
 Difficulty
Moderate
Difficulty
Moderate
 Steps
6
Steps
6
 Time Required
1 hour
Time Required
1 hour
Parts
- Glass insert Kit with Endura Flap Pet Door
- Screw Plugs
Tools
- Impact Driver or Screwdriver
- Utility Knife
Please read instructions & notes thoroughly before installation. We recommend hiring a handyman to install this product if you are not comfortable doing it yourself. Utah Pet Access can install in the greater Salt Lake City area and has contractors in several states. You can give them a call at (801) 652-9446 for a consultation and appointment.
Step 1 Remove Door From Frame

Step 2 Remove Screw Covers

Step 3 Remove the Existing Trim Frame

Step 4 Remove the Existing Kit

Step 5 Install the New Kit

Step 6 Install the Original Door Frame

