


Refund policy
We have a 90-day return policy, which means you have 90 days after receiving your item to request a return.
To be eligible for a return, your item must be in new, resellable condition. Pet doors that have been installed are not eligible for return. Custom orders are final sale and not eligible for return.
To start a return, you can contact us at customerservice@enduraflap.com. Please note that returns will need to be sent to the following address: 254 Granada Drive, San Luis Obispo CA 93401
If your return is accepted, we’ll send you a return shipping label, as well as instructions on how and where to send your package. Items sent back to us without first requesting a return will not be accepted.
You can always contact us for any return question at customerservice@enduraflap.com.
Damages and issues
Please inspect your order upon reception and contact us within 7 business days if the item is defective, damaged or if you receive the wrong item, so that we can evaluate the issue and make it right.
Exceptions / non-returnable items
Custom products are final sale and not eligible for return.
Exchanges
We do not offer exchanges. The fastest way to ensure you get what you want is to return the item you have, and once the return is accepted, make a separate purchase for the new item.
European Union 14 day cooling off period
Notwithstanding the above, if the merchandise is being shipped into the European Union, you have the right to cancel or return your order within 14 days, for any reason and without a justification. As above, your item must be in the same condition that you received it. You’ll also need the receipt or proof of purchase.
Refunds
We will notify you once we’ve received and inspected your return, and let you know if the refund was approved or not. If approved, you’ll be automatically refunded on your original payment method within 10 business days. Please remember it can take some time for your bank or credit card company to process and post the refund too.
If more than 15 business days have passed since we’ve approved your return, please contact us at customerservice@enduraflap.com.
After 90 Day Rules for Endura Flap Products:
- After 90 days, Items that are returned have a 15% restocking fee.
- After 120 days, Items that are returned have a 20% restocking fee.
- After 150 days, Items that are returned have a 35% restocking fee.
- Items cannot be accepted after 365 days.
Time frames begin the day that you receive your order.
Do you charge shipping for returns? We will send you a label for all returns in the US, but the return label is not free and is charged to your account. We do not refund any of the original shipping charges initially paid on the order.
If you are not satisfied with your purchase for any reason, and need to return pet door products please email customerservice@enduraflap.com or call (800) 826-2871 to submit a return request for a Return Merchandise Authorization (RMA) number within 90 days of receipt. To receive a refund of the merchandise cost the return item must be in original, resalable condition within 90 days of receipt for a full refund on the product cost.
When shipping returns back please make sure to package them properly to prevent damage. The provided return label will have the proper return address on it. All refunds will amount to the cost of the item, including taxes if applicable. We do not refund paid shipping. We process returns daily with the exception of weekends and holidays.
Size & Measurement Guide

Endura Flap Slidelock

 Product Details
 Product Details
Product Details
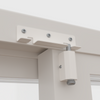
This sliding door lock is designed to solve a common issue with pet door setups. When a panel insert prevents your original lock from engaging, it creates a gap in security. This lock restores that missing function by creating a new, fixed locking point directly on the frame.
The steel construction provides a solid, reliable hold that keeps doors and windows from shifting or being opened from the outside. Once installed, it maintains consistent pressure, helping ensure the door stays firmly in place.
Installation is straightforward and uses included hardware to anchor the lock into the frame. It can be positioned at the top or bottom depending on your door configuration, allowing it to adapt to a wide range of setups.
Designed to blend in with your existing door frame, the low-profile look keeps your setup clean while adding a meaningful layer of security. It’s a simple upgrade that brings confidence back to your sliding door without interfering with your pet door’s daily use.
Installation Information
Endura Flap Slidelock
 Difficulty
Easy
Difficulty
Easy
 Steps
5
Steps
5
 Time Required
0.25 hours
Time Required
0.25 hours
Tools
- Screwdriver
Please read instructions & notes thoroughly before installation.
Step 1 Find the Perfect Locking Spot


Step 2 Prepping the Lock

Step 3 Mount the Lock

Step 4 Install the Locking Plate


Step 5 The Moment of Truth

