Sash Window Installation Instructions PDF
Video Transcription
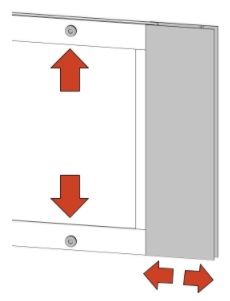
One side of the thermo sash is spring-loaded and has two thumb screws that lock or unlock it. When tightened, it is very strong.
STEP ONE
The first step is to open your window.

STEP TWO
The second step is to place the thermo sash into the track of your sash window.

STEP THREE
Then release the spring mechanism.
STEP FOUR
Tighten the thumbscrews once it is expanded the full width of the window.
FINDING THE PERFECT FIT
There are so many different types of windows that you may need to modify your installation using shims or other materials. In this case, adding a shim to the bottom left will even the Thermo Sash and align it with the window. Included weatherstripping will help further. You will see now that the gap is gone.

LOCKING COVER
The locking cover might hit the overhanging window if the window is thicker than 1 inch. If you cannot place the sash flush with the inside track wall, you might not be able to install your thermo sash with the locking cover in place.
REMOVING YOUR THERMO SASH
To remove the thermo sash in your window, you will first need to loosen the thumbscrews. You may need to lift the sash slightly to untwist the bottom screw. Then it is easiest to tighten the thumbscrews in the compressed position before you remove the thermo sash from the track.
Replacing the Flap in the Sash Pet Door
Video Transcript
STEP ONE - REMOVE THE SIDE PIECE
To replace the endura flap in your sash pet door, you will first need to remove the screws that are on the top and the bottom on the side of the flap. To do this, use a Phillips head screwdriver, then remove that side piece so that you can get to the rod.
STEP TWO - RETAINING RINGS
If you don't have retaining rings, then you can just pull it off. But if you do have retaining rings, you will have to remove those before you can thread out that rod. You can remove those retaining rings with a flathead screwdriver. You can then pull out that rod and lift the flap out.
STEP THREE - STRETCH OUT THE BELLOWS
Be sure to stretch out the bellows before you put the new flap in. You can use a hairdryer to help loosen up that flap before you do so. This will ensure a better seal.
STEP FOUR - THREAD THE ROD BACK IN
Make sure that the magnets line up and then thread the rod back through the top of the flap. It can be a little tricky to get it through the other end, but just keep working at it and you will get that in. If you do have retaining rings, you will need to put them back on at this point.
STEP FIVE - ATTACH THE SIDE PIECE
The outside will be the side that the screws go into, and this is going to go back on the side, and then you are going to re-screw those screws on the top and the bottom.
Switching Flap Side
Remove the screws on the top and bottom closest to the edge of the pet door. Then slightly loosen the screws closest to the glass. Next, slide off the side piece, then the flap assembly.


Rotate the flap assembly (essentially flipping it upside down) then slide it back in. Make sure the locking cover is on the same side as the thumbscrews. Replace the end spacer and screws.


QUESTIONS?
If you have any questions, you can call our customer service department at (800) 826-2871 or contact us by email at customerservice@enduraflap.com