


- Regular price
- $329.99
- Sale price
- $329.99
- Unit price
- per


- Energy-efficient double flap pet door for walls, designed for 4 1/2" to 7 1/2" thickness; aluminum telescoping tunnel is easy to install while boosting durability
- Insulating, durable flaps for extreme temperatures, ranging from -40 to 110 degrees Fahrenheit
- Heavy-duty magnets provide wind resistance up to 50 mph
- High-quality aluminum frame for durability and protection against harsh weather
- Secure steel-grade locking cover included for blocking access when needed; can be used on interior or exterior
- 100% designed, engineered, and manufactured in the U.S.
 Withstands Extreme Weather
 Worth Every Penny
 Advanced Skills Installation
 Product Details
Product Details
-
Improve energy efficiency: Double flap design insulates your home, lowering energy bills and keeping your home comfortable in extreme temperatures
- Versatile installation: Designed for walls 4 1/2" - 7 1/2" thick, the telescoping tunnel adjusts easily to fit a variety of wall depths
- Durable and long-lasting: Black and white aluminum frame and polyolefin polymer flap withstand harsh climates, ensuring your pet door lasts for years
- Superior wind resistance: Strong magnets line the flap on three sides, resisting winds up to 50mph for a secure seal
- Flexible and safe flap: The Endura Flap is slightly more rigid than other flaps but remains a safe, soft, and flexible option for your pet
- Easy access for pets: The taller, narrower flap design accommodates both large and small pets, allowing them to share the pet door comfortably
- Secure when needed: The included ABS plastic locking cover as strong as 16 gauge steel that can be used on the inside or outside frame to block access when necessary
-
Simplified installation: No more brackets or taping—just cut the hole, slide in the frames, screw the tunnels together, and seal
-
Premium metal tunnel: The all-aluminum telescoping tunnel resists warping, weather, and wear, providing superior protection and a cleaner finished look
- Highly-engineered pet door flap: Designed to be the most advanced pet door flap available, ensuring your home stays insulated and your pets can easily access the outdoors
Size Chart
- Small Double Flap: 6"w x 10"h
- Medium Double Flap: 8"w x 14"h
- Large Double Flap: 10"w x 18"h
- Extra Large Double Flap: 12"w x 22"h
- XX Large Double Flap: 14" w x 26" h
Flap Dimensions:
Double Flap:6"w x 10"h
The entry way your dog goes through.Outside Frame Dimensions
10 1/8"w x 16 3/4"h
The outer edge of the pet door.


Rough Cut Out:
8 5/8" w x 15" h
The size of the hole needed to fit your pet door into your wall.Flap Dimensions:
Double Flap:8"w x 14"h
The entry way your dog goes through.Outside Frame Dimensions
12 3/16"w x 20 3/4"h
The outer edge of the pet door.

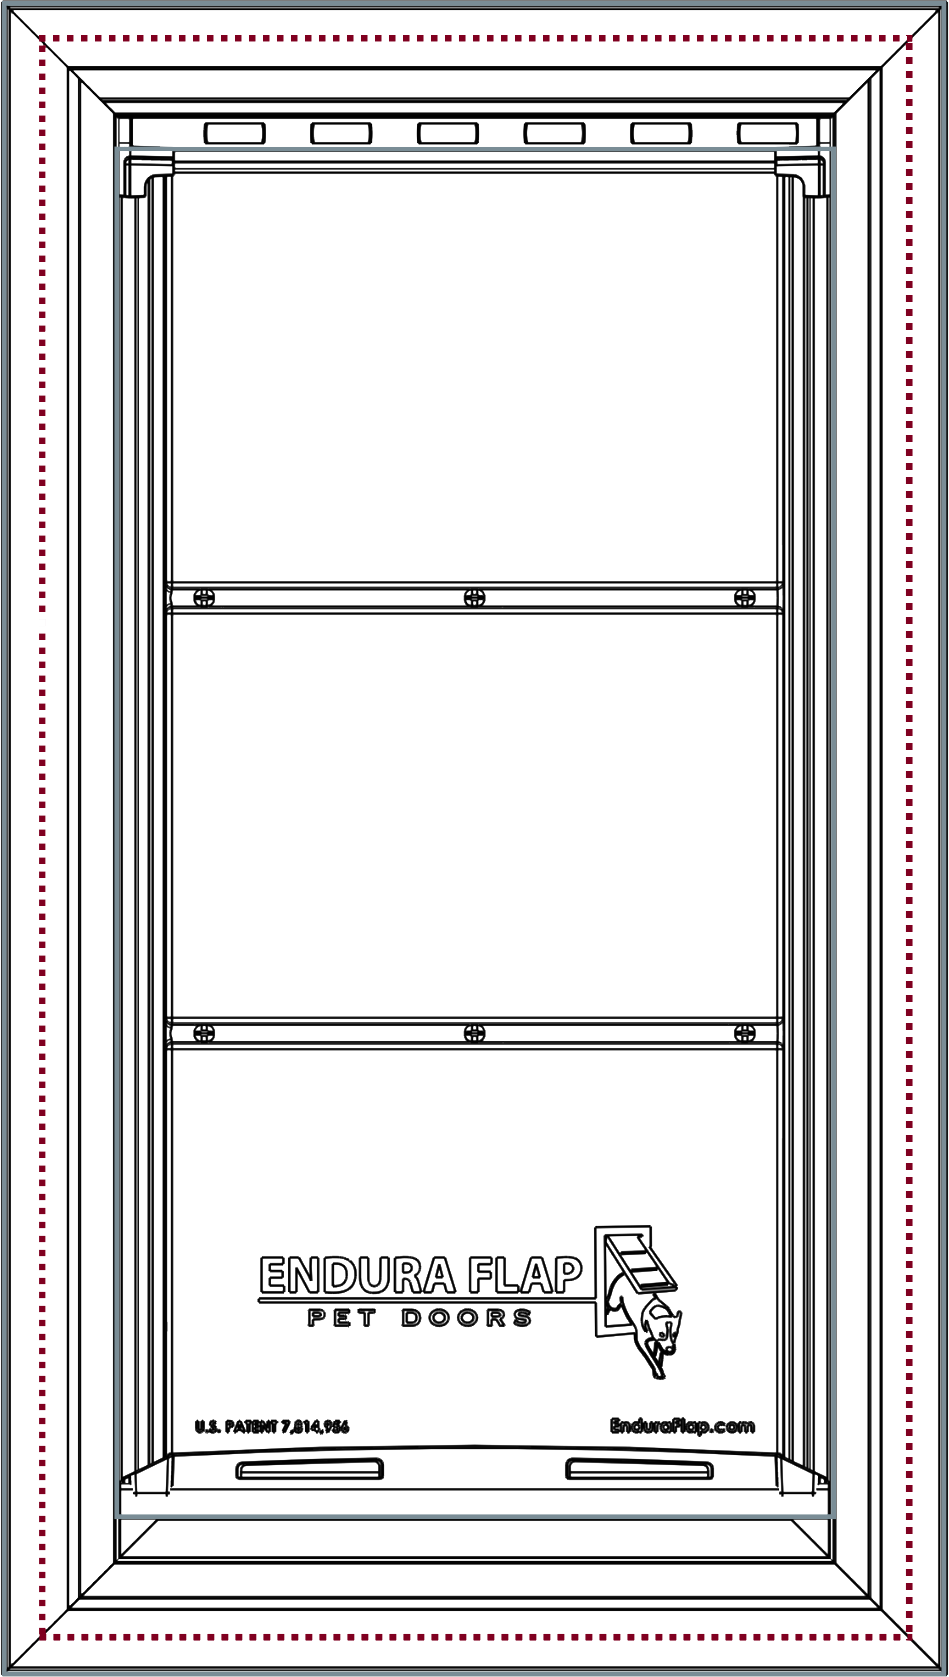
Rough Cut Out:
10 3/8" w x 19" h
The size of the hole needed to fit your pet door into your wall.Flap Dimensions:
Double Flap:10"w x 18"h
The entry way your dog goes through.Outside Frame Dimensions
14 3/16"w x 24 3/4"h
The outer edge of the pet door.


Rough Cut Out:
12 1/2" w x 23 1/16" h
The size of the hole needed to fit your pet door into your wall.Flap Dimensions:
Double Flap:12"w x 22"h
The entry way your dog goes through.Outside Frame Dimensions
16 1/4"w x 28 7/8"h
The outer edge of the pet door.


Rough Cut Out:
14 11/16" w x 27 1/16" h
The size of the hole needed to fit your pet door into your wall.Flap Dimensions:
14" w x 26" h
The entry way your dog goes through.Outside Frame Dimensions
18 1/4" w x 32 7/8" h
The outer edge of the pet door.
Rough Cut Out:
16 13/16" w x 31 1/16" h
The size of the hole needed to fit your pet door into your wall.| Flap Size | Flap Dimension | Rough Cut Out | Outside Frame Dimension | Recommended Pet Height |
|---|---|---|---|---|
| Small | 6" w x 10" h | 8 5/8" w x 15" h | 10 1/8" w x 16 3/4" h | 8" - 14" |
| Medium | 8" w x 14" h | 10 3/8" w x 19" h | 12 3/16" w x 20 3/4" h | 8" - 21" |
| Large | 10" w x 18" h | 12 1/2" w x 23 1/16" h | 14 3/16" w x 24 3/4" | 8" - 27" |
| Extra Large | 12" w x 22" h | 14 11/16" w x 27 1/16" h | 16 1/4" w x 28 7/8" h | 8" - 34" |
| XX Large | 14" w x 26" h | 16 13/16" w x 31 1/16" h | 18 1/4" w x 32 7/8" h | 8" - 41" |
Single flap or double flap? This is the double flap version. The double flap will provide more insulation for your home, perfect for extreme climates. With a double-flap system, there is a flap on each side of the tunnel and dead air space in between to add extra insulation.
Note: Endura Flap pet doors are not recommended for use by kittens or very small dogs. Cats have been successful using Small; however, a few have found the Medium difficult to use. We would not recommend using the Large or Extra Large or any of the double flap versions for cats.
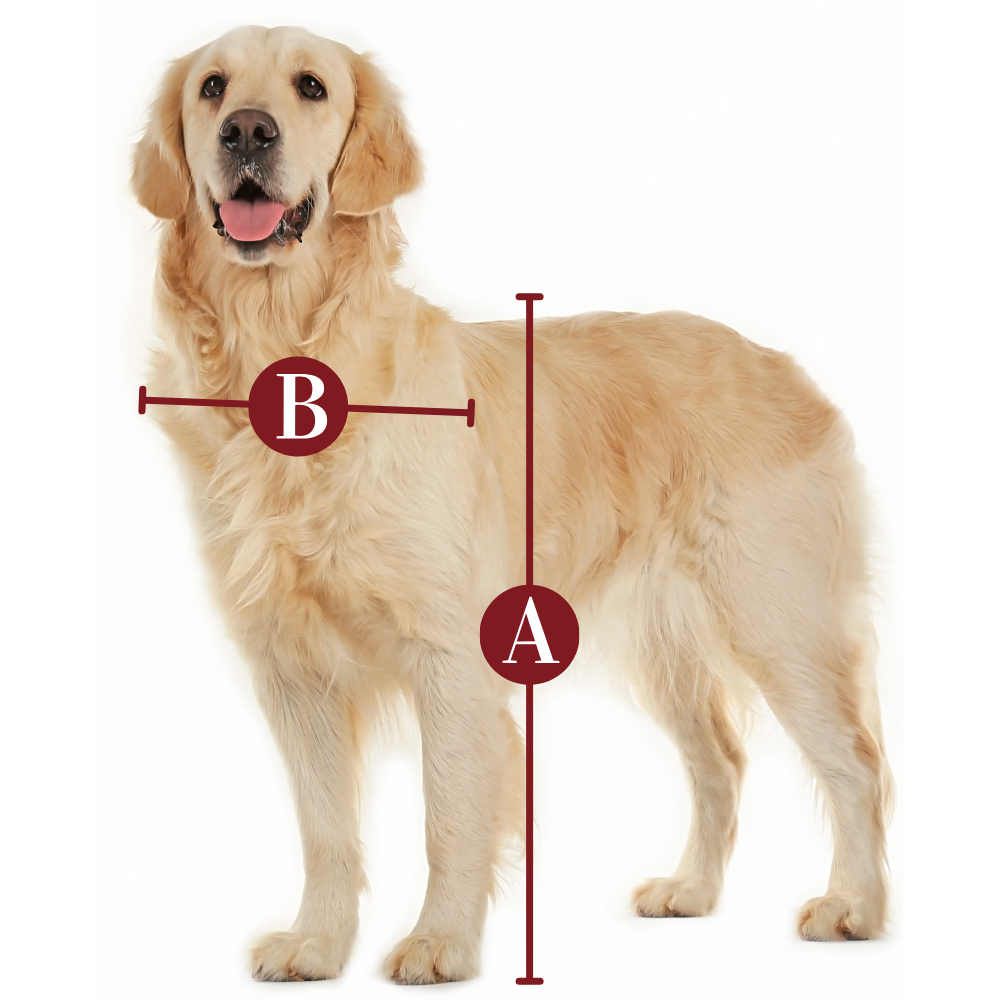
Find The Best Pet Door Size For My Pet

A
Pet Height: inches
B
Pet Width: inches
Installation Instructions
 Printable Version
 Difficulty
 Steps
Steps
 Time Required
 Flags
Flags
Parts
- Inner frame with tunnel
- Outer frame with tunnel
- Locking cover
- Inner wall template
- Caulking
- Sheet metal screws
- Outer wall transfer template with level and pencil
Tools
- Measuring tape
- Electric drill/driver (philips head and drill bit for outer wall)
- Safety gear
- Stud finder
- Drywall knife (or other tool for cutting the inside wall)
- Saw (for the outside wall, pick one that works with your wall material)
- Caulking gun
- Clamp (or an extra set of hands!)
Take a few minutes to read these instructions from start to finish— it’s worth it! If the thought of cutting a hole in your house makes your palms sweaty, no shame in bringing in a pro to handle it!
Step 1 Measure Your Pet

- First up, measure your pet and mark the wall 3 inches above their height—it’s the sweet spot for lining up the template.
Step 2 Prepare Wall for Installation

- Find a wall spot with a stud on one side and nothing scary like pipes or wires lurking behind it.
Step 3 Make the Rough Cutout


- Line up the template with the stud, level as needed, and tape it down so it doesn’t go anywhere.
- Trace the outline of the template. Once you’ve got your full template traced, remove it and finish cutting along the lines.
Step 4 MARK DRILL POINTS FOR THE OUTER WALL


- Take the included Outer Wall marking Template and place it on the bottom left corner of the tunnel on the outside frame, where it will gently touch the inside of the outer wall. The outside frame has the larger tunnel, and will not have the locking cover in it!
- From inside the house, slide the outside frame partway into the wall opening until the Outer Wall Template reaches the exterior wall.
- Using the small hole in the template and the provided pencil, mark the drill point.
- Repeat this process for the top right corner: position the outer wall marking template, align it properly, and mark the spot.
Step 5 DRILL THROUGH THE OUTER WALL

- Once both points are marked, drill straight through the wall at each location. These holes will guide you when installing the outer frame in the next step.
Step 6 MARK WHERE TO CUT THE OUTER WALL


- Head outside and line up the outer wall marking template with the holes you drilled earlier. Level the jig, then mark its corners on your wall.
- After marking your two corners, grab the cardboard template and line it up with the corners you marked to trace out the cut lines.
- Then, remove the template and get your saw ready for the next step.
Step 7 CUT OUTER WALL OPENING

- Cut the outer wall opening using the appropriate tool for your wall type (e.g., stucco, siding, etc.).
- Take your time cutting along the lines—it’s all about accuracy here!
Step 8 INSERT PET DOOR FRAMES

- Slide both frames (inside and outside) into the wall opening and telescope them together until snug against both walls. It is easier to insert the outside trim frame first, and this step is where an extra set of hands can be super helpful!
Step 9 SECURE THE FRAMES TO THE STUD


- Get the frames leveled and aligned, then grab a helper to gently squeeze them together from both sides of the wall. Or use a large clamp, which can also hold open the flap for you.
- While maintaining this pressure, drive two screws through the tunnels into the stud side—position one screw about one-third from the top and the other about one-third from the bottom. This ensures a snug and secure fit.
- Repeat on the other side, even if there’s no stud—it will still hold securely.
Step 10 TEST YOUR WORK

- Test the flap to ensure smooth operation. It should swing freely in both directions. If the flap catches at all, make adjustments before sealing the frame in the next step.
Step 11 SEAL THE FRAME

- To ensure your pet door is weather-tight and energy-efficient, follow these sealing steps:
- Seal the Interior Frame: Apply a bead of silicone caulk between the interior frame and the metal tunnel.
- Seal the Tunnel Seams: Apply a bead of caulk along the seams where the two telescoping metal tunnel sections meet. This will prevent air or water infiltration.
- Seal the Exterior Frame: On the outside of your home, apply caulk between the exterior frame and the wall. Be sure to seal the top and both sides, but not the bottom. You want that open for water to drain out.
- Seriously - don’t seal the bottom, that’s your drainage zone!
- Now, stand back, let your pet strut through their new door, and take all the credit. Well done!
Videos
Endura Flap High-Quality Design
Endura Flap Impact Test
Leaf Blower Test
Variable Magnetic Resistance
How to Remove Side Magnets for Easier Use
FAQ
Warranty
Endura Flap products have a lifetime warranty against defects in materials and workmanship under standard regular use. Endura Flap® Pet Doors Are 100% Designed, Engineered, and Manufactured in the USA. They are handmade for quality work in San Luis Obispo, California.
We will replace any defective parts at no cost to you. Defective parts may include incorrectly sized flaps, bent or dented frames, or improperly fitted parts.
Customers living outside of the continental United States are responsible for shipping costs as well as duties and taxes (if applicable) for any replacement parts or services covered under the warranty policy regardless of the replacement part or service's original cost.
Important Note:
- Endura Flap® pet doors have a lifetime warranty for normal wear & tear and manufacturing defects (dog-chewing is not covered).
- Damage caused by not using the product as intended, improper installation, and chewing is not covered under this warranty.
- Endura Flap Pet Doors used in a commercial application like a Kennel or Boarding facility have a three year warranty.
Customer Reviews
- Reviews
- Questions
Well built
I do not give favorable reviews for products I purchase until I have owned them for at least one year. That being said, the Dura flap for walls is well constructed physically. The flaps themselves seal very nicely, but I cannot write the performance in the winter yet. Please be aware before purchasing this product that the flaps are heavier than art products and the magnets are stronger. These two combined create a loud flap noise on both the outgoing and return to the sil. One issue that I would like to see corrected by the manufacture is that the plastic spacers for the side screws need to be secured in place. Once they fall out during the installation, putting them back in is nearly impossible. In conclusion, this product in the short term is very well built seals very nicely in the magnets are very strong so that the wind cannot blow them open. This product in my point of view is far overpriced for what it actually is. but in searching for this product, most of the competitors that were in the quality category with this product we’re also expensive. Going cheap on these things is never a good idea.
Perfect Solution
Product well built, excellent instructions. Perfect for our little Pug!
Great product!
Our dog Penny learned to use the door in about 2 hours. It’s a very sturdy door and our contractor said it was pretty easy to install. It keeps out the weather so far. Highs around 90 degrees F.