Improve energy efficiency: Double flap design insulates your home, lowering energy bills and keeping your home comfortable in extreme temperatures
Versatile installation: Can be installed in walls 2" - 7-3/4" thick, making it a perfect fit for various wall types
Durable and long-lasting: The aluminum frame and polyolefin polymer flap withstand harsh climates, ensuring your pet door lasts for years
Superior wind resistance: Strong magnets line the flap on three sides, resisting winds up to 50mph for a secure seal
Flexible and safe flap: The Endura Flap is slightly more rigid than other flaps but remains a safe, soft, and flexible option for your pet
Easy access for pets: The taller, narrower flap design accommodates both large and small pets, allowing them to share the pet door comfortably
Secure when needed: The included locking cover can be used on the inside or outside frame to block access when necessary
Simple flap replacement: The durable wood tunnel is easy to work with, allowing for straightforward flap replacement as needed
Wall protection: Sealing tunnel tape protects the tunnel and interior of your wall from the elements
Highly-engineered pet door flap: Designed to be the most advanced pet door flap available, ensuring your home stays insulated and your pets can easily access the outdoors
Size & Measurement Guidex
x
Size Chart
Small Double Flap: 6"w x 10"h
Medium Double Flap: 8"w x 14"h
Large Double Flap: 10"w x 18"h
Extra Large Double Flap: 12"w x 22"h
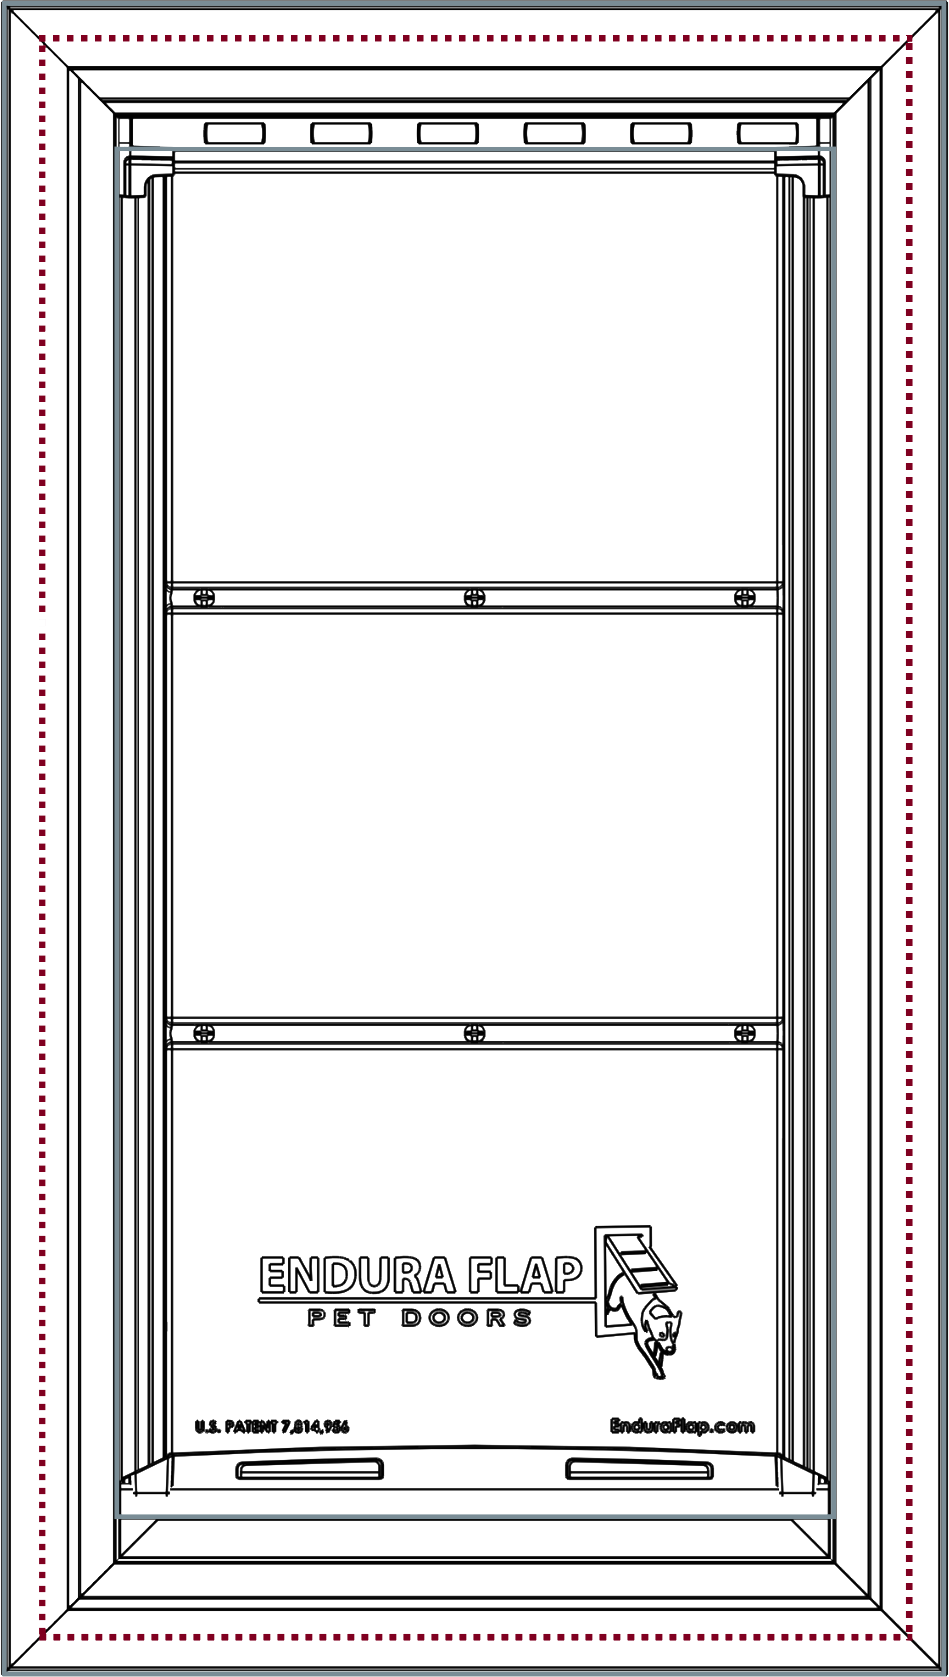
Flap Dimensions:
Double Flap:6"w x 10"h
The entry way your dog goes through.
Outside Frame Dimensions
10 1/8"w x 16 3/4"h
The outer edge of the pet door.
Rough Cut Out:
8"w x 14 5/8"h
The size of the hole needed to fit your pet door into your wall.
Flap Dimensions:
Double Flap:8"w x 14"h
The entry way your dog goes through.
Outside Frame Dimensions
12 3/16"w x 20 3/4"h
The outer edge of the pet door.
Rough Cut Out:
10"w x 18 5/8"h
The size of the hole needed to fit your pet door into your wall.
Flap Dimensions:
Double Flap:10"w x 18"h
The entry way your dog goes through.
Outside Frame Dimensions
14 3/16"w x 24 3/4"h
The outer edge of the pet door.
Rough Cut Out:
12 1/8"w x 22 5/8"h
The size of the hole needed to fit your pet door into your wall.
Flap Dimensions:
Double Flap:12"w x 22"h
The entry way your dog goes through.
Outside Frame Dimensions
16 1/4"w x 28 7/8"h
The outer edge of the pet door.
Rough Cut Out:
14 3/8"w x 26 5/8"h
The size of the hole needed to fit your pet door into your wall.
Flap Size
Flap Dimension
Rough Cut Out
Outside Frame Dimension
Recommended Pet Height
Small
6" w x 10" h
8" w x 14 5/8" h
10 1/8" w x 16 3/4" h
8" - 14"
Medium
8" w x 14" h
10" w x 18 5/8" h
12 3/16" w x 20 3/4" h
8" - 21"
Large
10" w x 18" h
12 1/8" w x 22 5/8" h
14 3/16" w x 24 3/4"
8" - 27"
Extra Large
12" w x 22" h
14 3/8" w x 26 5/8" h
16 1/4" w x 28 7/8" h
8" - 34"
Single flap or double flap? This is the double flap version. The double flap will provide more insulation for your home, perfect for extreme climates. With a double-flap system, there is a flap on each side of the tunnel and dead air space in between to add extra insulation.
Note: Endura Flap pet doors are not recommended for use by kittens or very small dogs. Cats have been successful using Small; however, a few have found the Medium difficult to use. We would not recommend using the Large or Extra Large or any of the double flap versions for cats.
Saw for Cutting Outer Wall (compatible with your wall material)
Razorblade (for trimming tape)
3/8” Drill Bit
Philips Screwdriver
Step 1Measure Your Pet
Measure your pet and make a mark at least 3” above your pet's height on your wall, this will
line up with the top of the template.
If a height taller than the max is needed (see chart below), you will need to cut a new piece of lumber for your pet door tunnel.
Flap Size
Max Cutout Height From Ground
Small
20"
Medium
24"
Large
30"
X-Large
No Max
Depending on pet height and the height of your baseboards you may need to cut
into the baseboards to install the frame. If you want to avoid that, make sure to set the height
accordingly.
Step 2Prepare Wall for Installation
Find a section of your wall that is against a stud on one side, but does not contain any
plumbing or wiring.
Once you find the stud, you can open a small area of the wall next to the stud
that is large enough for you to feel around.
You can double-check for any plumbing, wiring, studs, or additional bracing
that is in the way. Do not cut through plumbing, wiring, or bracing.
Extra-Large Size Only: This section will span from stud to stud for typical
stud spacing of 16” on center (14-1/2" between studs).
Step 3Make the Rough Cutout
Wall Mount Template Dimensions
Flap Size
Width
Height
Small
8"
14-5/8"
Medium
10"
18-5/8"
Large
12-1/8"
22-5/8"
Extra Large
14-3/8"
26-5/8"
Double check your template dimensions with the chart above before cutting into your
wall.
Line up the provided template with the edge of the stud and tape it to the wall. Trace the side
of the template along the stud. Remove the template, then cut along the stud line with a saw.
Line up the template again, adjusting to match the edge of the stud. Trace the remaining outline
of the template. Remove the template and cut the rest of the lines drawn.
Remove insulation inside the wall as needed. You can save some to put back
into open areas of the wall cavity.
Step 4Measure the Studs
Determine the width of tunnel pieces to use by test fitting each width or measuring the width of
studs inside the wall.
For 2x4 studs, use the narrower (3.5”) plywood sections.
For 2x6 studs, use the wider (5.5”) plywood sections.
Step 5Insert the Vertical Tunnel Piece
Screw the long wood screw halfway into the middle of the vertical piece to act as a handle.
Insert the vertical tunnel section inside the wall cavity and
tap into place with a mallet or hammer. The face of the plywood should be flush with the cutout.
Add back any insulation that can fit under the cutout.
Extra-Large Size Only:For standard 16" on center studs, the top and
bottom pieces will span from stud to stud so you can skip this step.
Extra-Large Size Only:For non-standard stud spacing, you will need to
get wood from a local hardware store to create the frame for the pet door. The frame opening
should match the size of the provided template.
Step 6Install Corner Brackets
Pre-install the four corner brackets at both ends of the two shorter plywood sections
that match the width of your studs. The brackets must be flush with the edge of the
short plywood pieces and centered.
Use only two screws per leg of the bracket.
Step 7Install Bottom and Top Tunnel Pieces
Insert the bottom tunnel piece and screw it into the existing stud making sure it is even with the
cut edges and slightly angled down towards the outside. You may need a hammer/mallet to tap it into
place if the fit is snug.
Screw the bottom tunnel piece to the vertical tunnel piece, making sure the
vertical tunnel piece is resting on the bottom of the inner wall for support.
Use the long wood screw partially inserted into the vertical piece to hold onto
it.
Insert the top tunnel piece and screw it into the existing stud and vertical
tunnel piece making sure it's level and even with the cut edge of the drywall.
Step 8Drill Through the Outer Wall
Remove the long screw from the vertical tunnel piece.
Using the provided transfer jig, drill 3/8” holes through the outer wall
from the inside of the opening on the top-left and bottom-right corners.
Make sure you use the appropriate type of drill for
your outer wall.
Step 9Mark Where to Cut the Outer Wall
From the outside, line up the hole transfer jig with the drilled
holes. Level the hole transfer jig and mark the jig’s corners on
your wall.
Use the drill bit as a pin to help line up the
hole transfer jig with the hole.
Using the template lined up with marked corners, mark all cut
lines.
Step 10Cut Outer Wall Opening
Cut along the inside of the lines as accurately as
possible.
Be careful not to damage the corner
brackets and screws near the corners.
Trim up any areas that aren't flush with the plywood
tunnel. Clean the inside of your wall of any dust or
debris.
Step 11aPrepare Tunnel for Sealing Tunnel Tape
Make sure the tunnel area is clean and dry.
The edge of the sealing tape
should line up with your inside wall, with the
rest of the tape overhanging the tunnel on the
outside.
To apply the sealing tunnel tape, start at the
middle of the upper tunnel and apply the tape
all around the tunnel, ending with a slight
overlap at the top. Make sure to press the tape
tightly into the corners as you go.
Once in place, firmly apply pressure all along
the tape to activate the adhesive.
Step 11bApply Sealing Tunnel Tape
Cut each corner up to the outer wall.
Fold back each piece of the sealing tape
against the outer wall, pressing firmly.
Apply caulking to the openings in all
four corners, sealing the cut area of
the tape to the outer wall.
The sealing tape will
be trimmed in a future step.
Step 12Screw in the Frames
Make sure the four tabs are upright and snug to the inside frame. You may have to loosen the screw to rotate it into place using a Phillips-head screwdriver.
Insert the inside frame and
level it in the opening with the
hole transfer jig. While holding
the frame flush against the
wall, use four wood screws to
screw the mounting tabs to the
inside of the tunnel.
If there are larger gaps you can
pre-bend the mounting tab toward
the tunnel.
Step 13Install the Outside
Frame
Repeat installation step
#12 for the outside
frame, making sure the
flap(s) swing through
both frames without
interference.
Step 14Seal the Inside Frame
From the
outside, apply
silicone in the
tunnel, around
the sides and
bottom edges of
the inside
frame. This will
seal the tunnel
tape to prevent
water intrusion.
Step 15Seal the Outside Frame
Use a sharp
razor blade to
trim off any
excess tunnel
tape that is
sticking out
past the outside
frame on all
four sides.
Apply silicone
where the
outside frame
meets the
exterior wall on
the top and
sides, but leave
the bottom open
to allow for
drainage.
Videos
Endura Flap Dog Door for Walls Installation Video
Alternate Installation Video
Endura Flap High-Quality Design
Endura Flap Impact Test
Leaf Blower Test
Variable Magnetic Resistance
How to Remove Side Magnets for Easier Use
FAQ
Can a large dog and a cat use the same double flap Endura Flap Dog Doors for Walls?
We recommend cats use the small flap since the larger flaps might be difficult for them to push through. However, if you have cats and dogs sharing an Endura Flap wall mount, you can decrease the magnetic resistance of the large flap's threshold to make it easier for cats to use. For small or medium pet doors, you can offset the magnets slightly to decrease the magnetic strength.
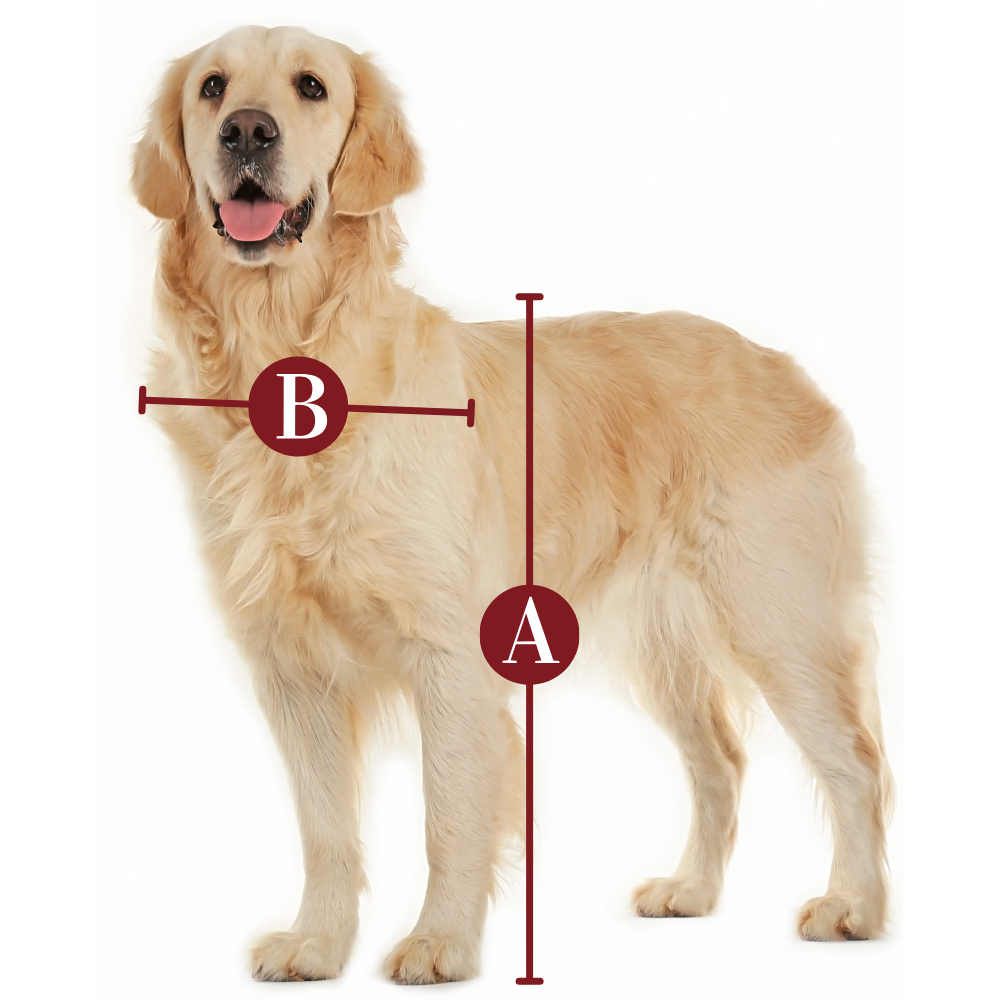
How do I know what flap size will fit my dog?
A perfectly fitted pet door will clear the top of your dog's back by at least 1". You also want the step over to be comfortable, no more than 1/3 your pet's shoulder height. Lastly, you want the width to allow your pet to go through without touching the sides, so about 1" wider than them.
Is the flap flexible? Seems like it would trap a dog if it backed up.
The Endura Flap is slightly more rigid than other economy-style flaps, but it is a safe, soft, flexible flap.
Is the flap loud when the dog goes in or out?
When the flap gets to its resting place there is a snapping sound when the magnets employ. This sound lets you know the door is doing its job sealing out the elements and keeping your heated or cooled air inside.
What side does the locking cover slide in?
All locking covers slide in from the top. If you purchase a double flap model, the locking cover can be used on the inside or outside the frame. If you purchase a single flap, the locking cover is on the interior frame (the side closest to the inside of your home).
Are in-wall pet door replacement flaps available?
Yes, we carry Endura Pet Door Replacement Flaps. They will work for all Endura Flap Pet Door models (wall mount, door mount, kennel doors, window sashes, and sliding glass door patio pet doors).
What material is the Endura Dog Door for Walls’ tunnel made from?
It is made out of wood and is protected by a layer of sealing tape.
I think a wall mount will stand out too much. Is there any way we can blend it into the rest of my home?
We would recommend checking out the Endura Flap Designer Pro Series for walls. It comes with everything you need to install your pet door into your wall. The outer frame is also less prominent, which would allow you to install the trimming of your choice around the pet door. It is also available in a stripped-back kit for any skilled carpenters who want to build of their doggy door to their preferences.
The sides of my flap no longer touch the frame. What happened?
It sounds like the bellows have contracted. You can follow the instructions on our troubleshooting guide to learn how to fix it.
The picture showed a pre-built tunnel with the pet door. Does the wood tunnel require assembly?
Our apologies if the pictures caused confusion. You will need to assemble the wood tunnel yourself. While wood tunnels require building into your wall or door for a secure fit, they offer easier installation, a more forgiving material, and a durable, leak-proof seal compared to pre-built metal or plastic options. We have detailed installation guides and dedicated customer support to assist you
Warranty
Endura Flap products have a lifetime warranty against defects in materials and workmanship under standard regular use. Endura Flap® Pet Doors Are 100% Designed, Engineered, and Manufactured in the USA. They are handmade for quality work in San Luis Obispo, California.
We will replace any defective parts at no cost to you. Defective parts may include incorrectly sized flaps, bent or dented frames, or improperly fitted parts.
Customers living outside of the continental United States are responsible for shipping costs as well as duties and taxes (if applicable) for any replacement parts or services covered under the warranty policy regardless of the replacement part or service's original cost.
Important Note:
Endura Flap® pet doors have a lifetime warranty for normal wear & tear and manufacturing defects (dog-chewing is not covered).
Damage caused by not using the product as intended, improper installation, and chewing is not covered under this warranty.
Endura Flap Pet Doors used in a commercial application like a Kennel or Boarding facility have a three year warranty.
Customer Reviews
Customer Reviews
4.7Based on 196 Reviews
5 ★
85%
166
4 ★
8%
16
3 ★
4%
7
2 ★
2%
4
1 ★
1%
3
Customer Photos
Write a ReviewAsk a Question
Reviews
Questions
Thank you for submitting a review!
Your input is very much appreciated. Share it with your friends so they can enjoy it too!
Tabs to secure outside framing and flap wasn't long enough to screw into the studs. I made up longer tabs myself to fix that issue. Other than that it was a simple easy install.
At my home in Texas I had a small Endura Flap Wall Mount Pet Door and loved it. I recently moved to Michigan and needed a dog door. So Endura Flap was my first choice. The doors work as designed and are very durable. They kept the Texas heat out and I never felt drafts when near the door.
Love it! I paid someone to install the door as I wasn't confident in my ability to do so.
My cats were already use to the idea of a cat door so they took to it quickly. They race in and out off to their catio when they have the zoomies.
I appreciate the small size, less of a hole in the wall. I am overall quite pleased with this cat door. :-)
The size of the hole needed to fit your pet door into your wall.
Flap Dimensions:
Double Flap:8"w x 14"h
The entry way your dog goes through.
Outside Frame Dimensions
12 3/16"w x 20 3/4"h
The outer edge of the pet door.
Rough Cut Out:
10"w x 18 5/8"h
The size of the hole needed to fit your pet door into your wall.
Flap Dimensions:
Double Flap:10"w x 18"h
The entry way your dog goes through.
Outside Frame Dimensions
14 3/16"w x 24 3/4"h
The outer edge of the pet door.
Rough Cut Out:
12 1/8"w x 22 5/8"h
The size of the hole needed to fit your pet door into your wall.
Flap Dimensions:
Double Flap:12"w x 22"h
The entry way your dog goes through.
Outside Frame Dimensions
16 1/4"w x 28 7/8"h
The outer edge of the pet door.
Rough Cut Out:
14 3/8"w x 26 5/8"h
The size of the hole needed to fit your pet door into your wall.
Flap Size
Flap Dimension
Rough Cut Out
Outside Frame Dimension
Recommended Pet Height
Small
6" w x 10" h
8" w x 14 5/8" h
10 1/8" w x 16 3/4" h
8" - 14"
Medium
8" w x 14" h
10" w x 18 5/8" h
12 3/16" w x 20 3/4" h
8" - 21"
Large
10" w x 18" h
12 1/8" w x 22 5/8" h
14 3/16" w x 24 3/4"
8" - 27"
Extra Large
12" w x 22" h
14 3/8" w x 26 5/8" h
16 1/4" w x 28 7/8" h
8" - 34"
Single flap or double flap? This is the double flap version. The double flap will provide more insulation for your home, perfect for extreme climates. With a double-flap system, there is a flap on each side of the tunnel and dead air space in between to add extra insulation.
Note: Endura Flap pet doors are not recommended for use by kittens or very small dogs. Cats have been successful using Small; however, a few have found the Medium difficult to use. We would not recommend using the Large or Extra Large or any of the double flap versions for cats.
Saw for Cutting Outer Wall (compatible with your wall material)
Razorblade (for trimming tape)
3/8” Drill Bit
Philips Screwdriver
Step 1Measure Your Pet
Measure your pet and make a mark at least 3” above your pet's height on your wall, this will
line up with the top of the template.
If a height taller than the max is needed (see chart below), you will need to cut a new piece of lumber for your pet door tunnel.
Flap Size
Max Cutout Height From Ground
Small
20"
Medium
24"
Large
30"
X-Large
No Max
Depending on pet height and the height of your baseboards you may need to cut
into the baseboards to install the frame. If you want to avoid that, make sure to set the height
accordingly.
Step 2Prepare Wall for Installation
Find a section of your wall that is against a stud on one side, but does not contain any
plumbing or wiring.
Once you find the stud, you can open a small area of the wall next to the stud
that is large enough for you to feel around.
You can double-check for any plumbing, wiring, studs, or additional bracing
that is in the way. Do not cut through plumbing, wiring, or bracing.
Extra-Large Size Only: This section will span from stud to stud for typical
stud spacing of 16” on center (14-1/2" between studs).
Step 3Make the Rough Cutout
Wall Mount Template Dimensions
Flap Size
Width
Height
Small
8"
14-5/8"
Medium
10"
18-5/8"
Large
12-1/8"
22-5/8"
Extra Large
14-3/8"
26-5/8"
Double check your template dimensions with the chart above before cutting into your
wall.
Line up the provided template with the edge of the stud and tape it to the wall. Trace the side
of the template along the stud. Remove the template, then cut along the stud line with a saw.
Line up the template again, adjusting to match the edge of the stud. Trace the remaining outline
of the template. Remove the template and cut the rest of the lines drawn.
Remove insulation inside the wall as needed. You can save some to put back
into open areas of the wall cavity.
Step 4Measure the Studs
Determine the width of tunnel pieces to use by test fitting each width or measuring the width of
studs inside the wall.
For 2x4 studs, use the narrower (3.5”) plywood sections.
For 2x6 studs, use the wider (5.5”) plywood sections.
Step 5Insert the Vertical Tunnel Piece
Screw the long wood screw halfway into the middle of the vertical piece to act as a handle.
Insert the vertical tunnel section inside the wall cavity and
tap into place with a mallet or hammer. The face of the plywood should be flush with the cutout.
Add back any insulation that can fit under the cutout.
Extra-Large Size Only:For standard 16" on center studs, the top and
bottom pieces will span from stud to stud so you can skip this step.
Extra-Large Size Only:For non-standard stud spacing, you will need to
get wood from a local hardware store to create the frame for the pet door. The frame opening
should match the size of the provided template.
Step 6Install Corner Brackets
Pre-install the four corner brackets at both ends of the two shorter plywood sections
that match the width of your studs. The brackets must be flush with the edge of the
short plywood pieces and centered.
Use only two screws per leg of the bracket.
Step 7Install Bottom and Top Tunnel Pieces
Insert the bottom tunnel piece and screw it into the existing stud making sure it is even with the
cut edges and slightly angled down towards the outside. You may need a hammer/mallet to tap it into
place if the fit is snug.
Screw the bottom tunnel piece to the vertical tunnel piece, making sure the
vertical tunnel piece is resting on the bottom of the inner wall for support.
Use the long wood screw partially inserted into the vertical piece to hold onto
it.
Insert the top tunnel piece and screw it into the existing stud and vertical
tunnel piece making sure it's level and even with the cut edge of the drywall.
Step 8Drill Through the Outer Wall
Remove the long screw from the vertical tunnel piece.
Using the provided transfer jig, drill 3/8” holes through the outer wall
from the inside of the opening on the top-left and bottom-right corners.
Make sure you use the appropriate type of drill for
your outer wall.
Step 9Mark Where to Cut the Outer Wall
From the outside, line up the hole transfer jig with the drilled
holes. Level the hole transfer jig and mark the jig’s corners on
your wall.
Use the drill bit as a pin to help line up the
hole transfer jig with the hole.
Using the template lined up with marked corners, mark all cut
lines.
Step 10Cut Outer Wall Opening
Cut along the inside of the lines as accurately as
possible.
Be careful not to damage the corner
brackets and screws near the corners.
Trim up any areas that aren't flush with the plywood
tunnel. Clean the inside of your wall of any dust or
debris.
Step 11aPrepare Tunnel for Sealing Tunnel Tape
Make sure the tunnel area is clean and dry.
The edge of the sealing tape
should line up with your inside wall, with the
rest of the tape overhanging the tunnel on the
outside.
To apply the sealing tunnel tape, start at the
middle of the upper tunnel and apply the tape
all around the tunnel, ending with a slight
overlap at the top. Make sure to press the tape
tightly into the corners as you go.
Once in place, firmly apply pressure all along
the tape to activate the adhesive.
Step 11bApply Sealing Tunnel Tape
Cut each corner up to the outer wall.
Fold back each piece of the sealing tape
against the outer wall, pressing firmly.
Apply caulking to the openings in all
four corners, sealing the cut area of
the tape to the outer wall.
The sealing tape will
be trimmed in a future step.
Step 12Screw in the Frames
Make sure the four tabs are upright and snug to the inside frame. You may have to loosen the screw to rotate it into place using a Phillips-head screwdriver.
Insert the inside frame and
level it in the opening with the
hole transfer jig. While holding
the frame flush against the
wall, use four wood screws to
screw the mounting tabs to the
inside of the tunnel.
If there are larger gaps you can
pre-bend the mounting tab toward
the tunnel.
Step 13Install the Outside
Frame
Repeat installation step
#12 for the outside
frame, making sure the
flap(s) swing through
both frames without
interference.
Step 14Seal the Inside Frame
From the
outside, apply
silicone in the
tunnel, around
the sides and
bottom edges of
the inside
frame. This will
seal the tunnel
tape to prevent
water intrusion.
Step 15Seal the Outside Frame
Use a sharp
razor blade to
trim off any
excess tunnel
tape that is
sticking out
past the outside
frame on all
four sides.
Apply silicone
where the
outside frame
meets the
exterior wall on
the top and
sides, but leave
the bottom open
to allow for
drainage.
Videos
Endura Flap Dog Door for Walls Installation Video
Alternate Installation Video
Endura Flap High-Quality Design
Endura Flap Impact Test
Leaf Blower Test
Variable Magnetic Resistance
How to Remove Side Magnets for Easier Use
FAQ
Can a large dog and a cat use the same double flap Endura Flap Dog Doors for Walls?
We recommend cats use the small flap since the larger flaps might be difficult for them to push through. However, if you have cats and dogs sharing an Endura Flap wall mount, you can decrease the magnetic resistance of the large flap's threshold to make it easier for cats to use. For small or medium pet doors, you can offset the magnets slightly to decrease the magnetic strength.
How do I know what flap size will fit my dog?
A perfectly fitted pet door will clear the top of your dog's back by at least 1". You also want the step over to be comfortable, no more than 1/3 your pet's shoulder height. Lastly, you want the width to allow your pet to go through without touching the sides, so about 1" wider than them.
Is the flap flexible? Seems like it would trap a dog if it backed up.
The Endura Flap is slightly more rigid than other economy-style flaps, but it is a safe, soft, flexible flap.
Is the flap loud when the dog goes in or out?
When the flap gets to its resting place there is a snapping sound when the magnets employ. This sound lets you know the door is doing its job sealing out the elements and keeping your heated or cooled air inside.
What side does the locking cover slide in?
All locking covers slide in from the top. If you purchase a double flap model, the locking cover can be used on the inside or outside the frame. If you purchase a single flap, the locking cover is on the interior frame (the side closest to the inside of your home).
Are in-wall pet door replacement flaps available?
Yes, we carry Endura Pet Door Replacement Flaps. They will work for all Endura Flap Pet Door models (wall mount, door mount, kennel doors, window sashes, and sliding glass door patio pet doors).
What material is the Endura Dog Door for Walls’ tunnel made from?
It is made out of wood and is protected by a layer of sealing tape.
I think a wall mount will stand out too much. Is there any way we can blend it into the rest of my home?
We would recommend checking out the Endura Flap Designer Pro Series for walls. It comes with everything you need to install your pet door into your wall. The outer frame is also less prominent, which would allow you to install the trimming of your choice around the pet door. It is also available in a stripped-back kit for any skilled carpenters who want to build of their doggy door to their preferences.
The sides of my flap no longer touch the frame. What happened?
It sounds like the bellows have contracted. You can follow the instructions on our troubleshooting guide to learn how to fix it.
The picture showed a pre-built tunnel with the pet door. Does the wood tunnel require assembly?
Our apologies if the pictures caused confusion. You will need to assemble the wood tunnel yourself. While wood tunnels require building into your wall or door for a secure fit, they offer easier installation, a more forgiving material, and a durable, leak-proof seal compared to pre-built metal or plastic options. We have detailed installation guides and dedicated customer support to assist you
Warranty
Endura Flap products have a lifetime warranty against defects in materials and workmanship under standard regular use. Endura Flap® Pet Doors Are 100% Designed, Engineered, and Manufactured in the USA. They are handmade for quality work in San Luis Obispo, California.
We will replace any defective parts at no cost to you. Defective parts may include incorrectly sized flaps, bent or dented frames, or improperly fitted parts.
Customers living outside of the continental United States are responsible for shipping costs as well as duties and taxes (if applicable) for any replacement parts or services covered under the warranty policy regardless of the replacement part or service's original cost.
Important Note:
Endura Flap® pet doors have a lifetime warranty for normal wear & tear and manufacturing defects (dog-chewing is not covered).
Damage caused by not using the product as intended, improper installation, and chewing is not covered under this warranty.
Endura Flap Pet Doors used in a commercial application like a Kennel or Boarding facility have a three year warranty.
Customer Reviews
Customer Reviews
4.7Based on 196 Reviews
5 ★
85%
166
4 ★
8%
16
3 ★
4%
7
2 ★
2%
4
1 ★
1%
3
Customer Photos
Write a ReviewAsk a Question
Reviews
Questions
Thank you for submitting a review!
Your input is very much appreciated. Share it with your friends so they can enjoy it too!
Tabs to secure outside framing and flap wasn't long enough to screw into the studs. I made up longer tabs myself to fix that issue. Other than that it was a simple easy install.
At my home in Texas I had a small Endura Flap Wall Mount Pet Door and loved it. I recently moved to Michigan and needed a dog door. So Endura Flap was my first choice. The doors work as designed and are very durable. They kept the Texas heat out and I never felt drafts when near the door.
Love it! I paid someone to install the door as I wasn't confident in my ability to do so.
My cats were already use to the idea of a cat door so they took to it quickly. They race in and out off to their catio when they have the zoomies.
I appreciate the small size, less of a hole in the wall. I am overall quite pleased with this cat door. :-)


 Product Details


 Printable Version
 Difficulty
 Steps
Steps
 Time Required
 Flags
Flags


