


- Regular price
- $369.99
- Sale price
- $369.99
- Unit price
- per


- Innovative Thermo Sash 3e Pet Door designed for sash windows, perfect for renters and vacation homes
- Energy-efficient design featuring 3/16" clear safety glass, sturdy aluminum framing, and insulating flap, ensuring temperature regulation
- Accommodates various pet sizes with four flap sizes available, fitting cats to large breed dogs
- Easy installation requiring just minutes and a 1" wide window track, making it a convenient option for any home
- Secure steel-grade locking cover provides peace of mind and protection for your pet and home
- Extra Large Flap 22" - 25" Width Panel is made with plexiglass
 Extreme Weather Resistance
 Install Multiple
 Easy Installation in Minutes
 Product Details
Product Details
-
High-quality construction: Thermo Sash 3e Pet Door features a sturdy aluminum frame and 3/16" clear safety glass for added durability and insulation
- Energy-efficient flap: Insulating flap with a complete magnetic seal, designed to stay closed in winds up to 50mph, keeping your home comfortable and protected
- Flexible installation: Easy to install in minutes, with no permanent alterations required, making it ideal for renters and vacation homes
- Fits various sash window sizes: Designed to fit all vertical sliding sash window widths with a track width of at least 1"
- Suitable for all pets: Available in four sizes to accommodate cats and large breed dogs
- Customizable flap position: Easily switch the side of the panel the pet door is on to suit your needs and preferences
- Insulation and weather resistance: Draft stopper and weatherstripping included for added insulation and protection against the elements
- Extra-large panel option: All-metal panel with no glass for the Extra Large Flap 22" - 25" Width, custom-made-to-order, and non-returnable
- Lifetime warranty: Ensuring peace of mind and long-lasting satisfaction
- Innovative design: Combines the convenience of a pet door with the insulation and energy efficiency of modern windows
Please note that the Extra Large Flap 22" - 25" Width Panel is made with plexiglass, is custom-made-to-order, and is non-returnable.
Need help Installing? Take a look at our Thermo Sash Installation page.


Size Chart
- Small6"w x 11"h
- Medium 8"w x 15"h
- Large 10"w x 19"h
- Extra Large 12"w x 23"h
Flap Dimensions:
6"w x 11”h
The entry way your dog goes through.

Height To Raise Window
18 1/2"
How high you must raise your window in order to fit the panel into the track.Flap Dimensions:
8"w x 15"h
The entry way your dog goes through. Height To Raise Window
22 1/2"
How high you must raise your window in order to fit the panel into the track.Flap Dimensions:
10"w x 19"h
The entry way your dog goes through. Height To Raise Window
26 1/2"
How high you must raise your window in order to fit the panel into the track.Flap Dimensions:
12"w x 23"h
The entry way your dog goes through. Height To Raise Window
30 1/2”
How high you must raise your window in order to fit the panel into the track.| Flap Size | Flap Dimension | Height To Raise Window | Recommended Pet Height |
|---|---|---|---|
| Small | 6" w x 11" h | 18 1/2" | 9" - 15" |
| Medium | 8" w x 15" h | 22 1/2" | 9" - 21" |
| Large | 10" w x 19" h | 26 1/2" | 9" - 27" |
| Extra Large | 12" w x 23" h | 30 1/2" | 9" - 34" |
For your adjustment range, you need to measure the length of your sash window track from the furthest left to right. The adjustment range of your pet door should ideally have your track length in the middle. Custom orders are subject to special restrictions. The following adjustment ranges are available:
- 22"– 25"
- 25"– 28"
- 28"– 31"
- 31"– 34"
- 34"– 37"
- 37"– 40"
- 40"– 43"
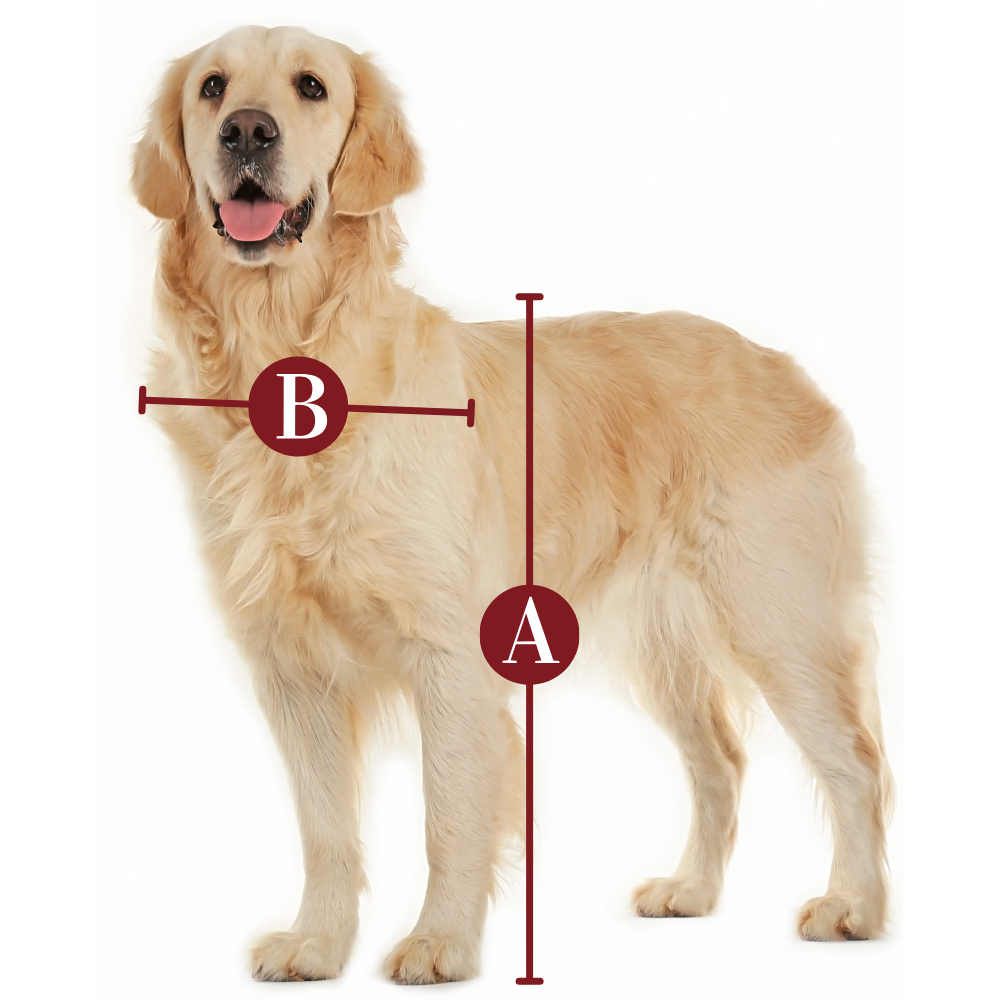
Find The Best Pet Door Size For My Pet

A
Pet Height: inches
B
Pet Width: inches
Installation Instructions
 Printable Version
 Difficulty
 Steps
Steps
 Time Required
 Sections
 Flags
Flags
Parts
- 1 Sash Window Pet Door
- 1 Foam Weather Strip
- 1 Center Post Weather Seal Draft Stopper
Tools
- Flathead Screwdriver
Please read instructions & notes thoroughly before installation.
Step 1 Release Spring Mechanism

- Loosen the width adjustment locks at the end of the pet door insert with the screwdriver. This allows the spring mechanism to move freely from side to side.
Step 2 Check Panel Fit

- Insert the sash into the window track. Push against the spring mechanism and swing the opposite end into the opposite window track. Gently release. Tighten the width adjustment locks.
Step 3 Apply Weatherstripping

- Once you're sure the panel fits, remove it from the frame and lay it on its side on the ground.
- For foam weatherstripping: Peel the backing off the foam weatherstripping. Press it along both edges of the panel, trimming as needed with scissors to ensure a snug fit.
- For rubber weatherstripping: Clean the edge of your sliding door or window with rubbing alcohol to help the weatherstripping stick properly. Starting at the top or bottom, peel and press the strip into place with the folded edge facing indoors—align angled cuts if you have two pieces. For best results, apply the seal to the sliding door or window, but it can go on the pet door panel if needed.
Step 4 Mount Seal Draft Stopper

- Mount the Center Post Weather Seal Draft Stopper. This strip prevents air from leaking between the window frame when raised to accommodate the sash. Trim to fit with scissors.
- Put the panel back into the window track. Tighten width adjustment locks.
Switch the Side of the Flap
You can switch which side of the sash panel the pet door flap is on to best fit your home.
Step 1
- Remove the screws on the top and bottom closest to the edge of the pet door. Then slightly loosen the screws closest to the glass. Next, slide off the side piece, then the flap assembly.
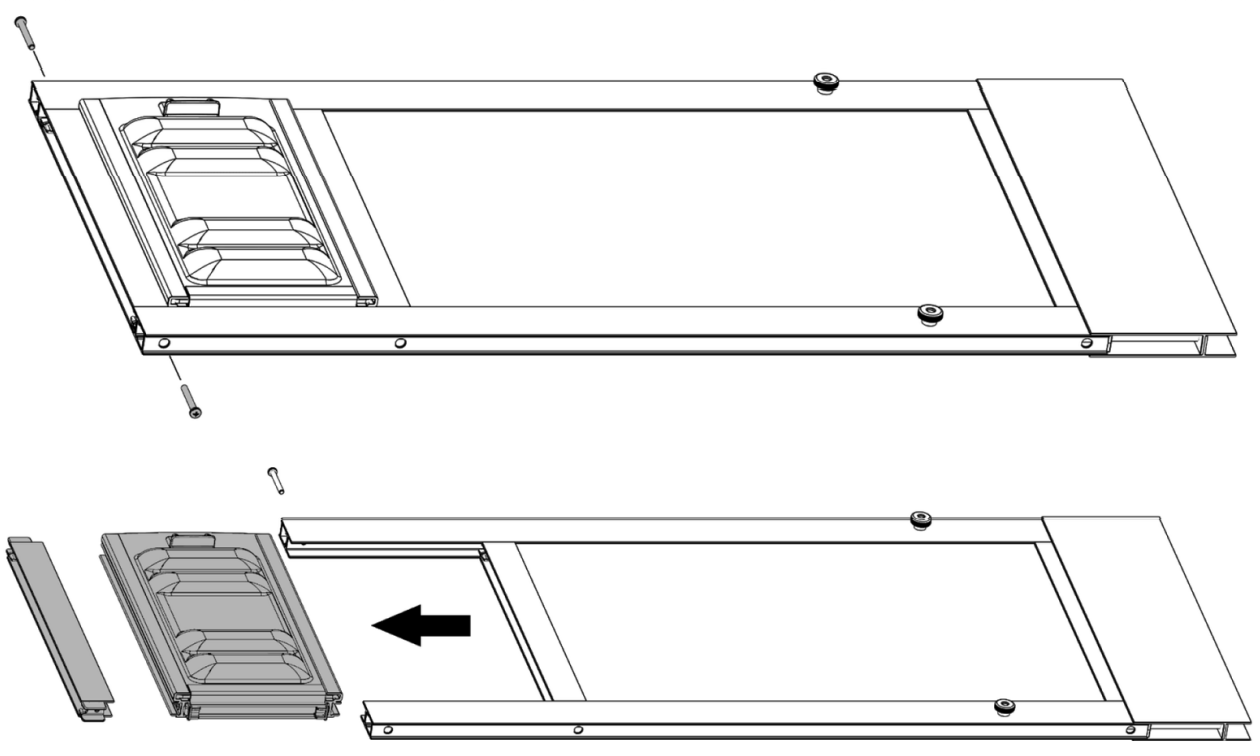
Step 2
- Rotate the flap assembly (essentially flipping it upside down) then slide it back in. Make sure the locking cover is on the same side as the width adjustment locks.
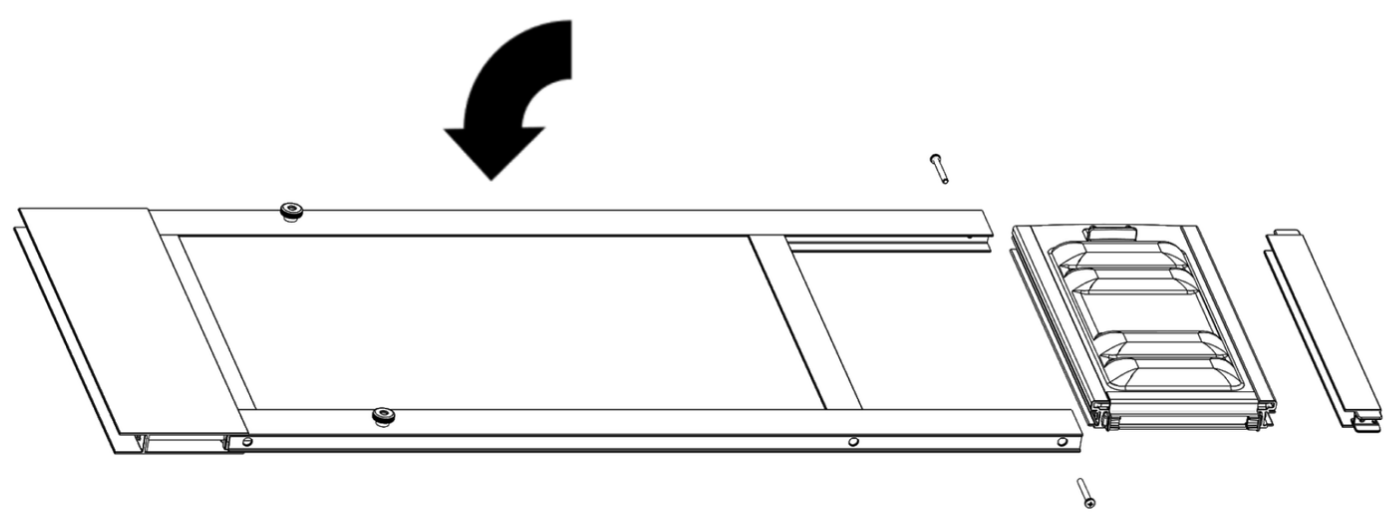
Step 3
- Replace the end spacer and screws.
LOCKING YOUR WINDOW
For a permanent lock, install a wood screw in the track immediately above the window on both sides. You will no longer be able to raise the window. For a temporary lock, place a removable wooden dowel or Charley bar in either track above the window, shown in Detail 1.

HEIGHT OF YOUR WINDOW
Make sure you place steps or ramps leading to your pet’s door at a height that works! When they go through the flap, the top of the flap should be at least 1" (2,5 cm) higher than the top of their back. Watch your pet and adjust as needed to keep them comfortable.
Videos
Installing a Thermo Sash 3e
How to Measure Your Door for a Sash Window Pet Door
Variable Magnetic Resistance
Replacing the Flap in the Sash Pet Door
Switching Flap Sides
Additional Switch the Side of the Flap
Wind Test
FAQ
Warranty
Endura Flap products have a lifetime warranty against defects in materials and workmanship under standard regular use. Endura Flap® Pet Doors Are 100% Designed, Engineered, and Manufactured in the USA. They are handmade for quality work in San Luis Obispo, California.
We will replace any defective parts at no cost to you. Defective parts may include incorrectly sized flaps, bent or dented frames, or improperly fitted parts.
Customers living outside of the continental United States are responsible for shipping costs as well as duties and taxes (if applicable) for any replacement parts or services covered under the warranty policy regardless of the replacement part or service's original cost.
Important Note:
- Endura Flap® pet doors have a lifetime warranty for normal wear & tear and manufacturing defects (dog-chewing is not covered).
- Damage caused by not using the product as intended, improper installation, and chewing is not covered under this warranty.
- Endura Flap Pet Doors used in a commercial application like a Kennel or Boarding facility have a three year warranty.
Customer Reviews
- Reviews
- Questions
Great dog door - easy to install, seals well
Love the hard door flap for our window unit dog door. It seals great, no drafts and it's easy to install in a window. Only downside is the dog door cover won't slide in when the unit is installed because the tracks for the cover don't stick out far enough to be past the window so the cover can't go down (without seriously scraping the window frame). When we need the cover on, we lean it up against the dog door and that's enough to keep our two littles from going out.
Repeat customer - great quality
The order took a bit longer due to hitting spring rush, but we have purchased a door in the past, for a smaller dog, and been very happy with it for over 10 years. We needed a new one for a much larger dog, and after 2-3 days of training, the big dog is using it very happily! Would definitely recommend. The magnets do a great job keeping the weather and bugs out.
Great alternative to sliding door option
This worked well for our German Shorthair Pointer as we have large windows. Using a sliding door insert wasn’t an option for us. It would have left too small of a space to walk through. Th install was pretty easy. Make sure you are measuring the 1” space inside the opening. Ours was just shy of that, but the outside of the opening was right on. We had to do some maneuvering to get it to stay tight. Gypsy loves her new freedom!
Shipping and service
The product is fine but overpriced. Service and delivery should be top notch at that price. Took too long for delivery and door was damaged It’s now been over a month and don’t have the corrected part. I would not order again at this price.