


 Product Details


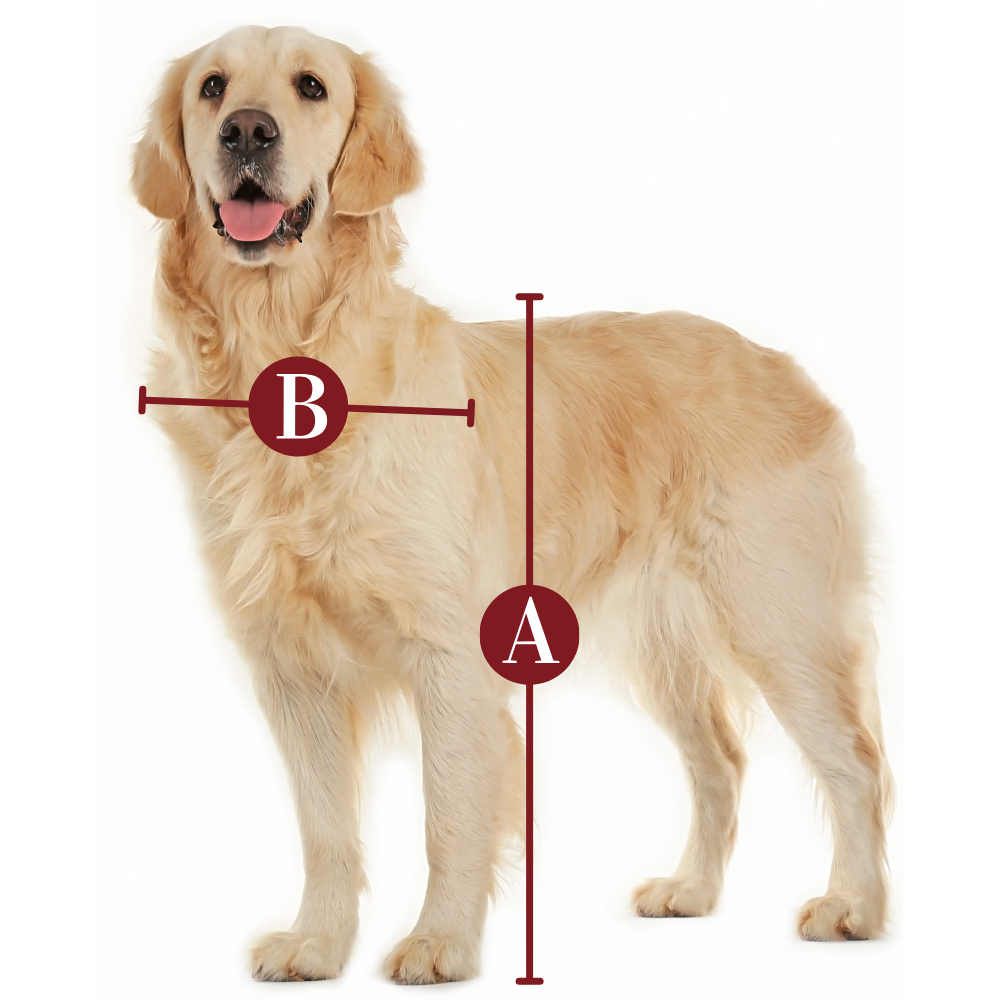
Flap Dimensions:
6"w x 11"h
The entry way your dog goes through.Overall Panel Width
10 3/16"
How wide your panel is.


Step-Over Height
3" - 4 1/2"
The distance from the bottom of the panel to the bottom of your flap.Free U.S. Shipping & Lifetime Warranty For All Endura Flap Pet Doors


 Superior Weather Resistance
 Great for Renters
 Easy Installation
6"w x 11"h
The entry way your dog goes through.10 3/16"
How wide your panel is. 3" - 4 1/2"
The distance from the bottom of the panel to the bottom of your flap.8"w x 15"h
The entry way your dog goes through.12 1/4"
How wide your panel is. 3" - 4 1/2"
The distance from the bottom of the panel to the bottom of your flap.10"w x 19"h
The entry way your dog goes through.14 1/4"
How wide your panel is.


3" - 6"
The distance from the bottom of the panel to the bottom of your flap.12"w x 23"h
The entry way your dog goes through.16 3/8”
How wide your panel is. 3" - 6"
The distance from the bottom of the panel to the bottom of your flap.| Flap Size | Flap Dimension | Step Over Range | Overall Panel Width | Recommended Pet Height |
|---|---|---|---|---|
| Small | 6" w x 11" h | 3" - 4-1/2" (ships at 3") | 10-3/16" | 9" - 15" |
| Medium | 8" w x 15" h | 3" - 4-1/2" (ships at 3") | 12-1/4" | 9" - 21" |
| Large | 10" w x 19" h | 3" - 6" (ships at 4.5") | 14-1/4" | 9" - 27" |
| Extra Large | 12" w x 23" h | 3" - 6" (ships at 4.5") | 16-3/8" | 9" - 34" |
Note: Endura Flap is not recommended for kittens or very small dogs.
| Custom Height Minimum & Maximum Heights | ||
|---|---|---|
| Model | Minimum | Maximum |
| Small | 35" | 100" |
| Medium | 42" | 107" |
| Large | 48" | 117" |
| Extra Large | 46" | 123" |
Custom orders are final sale once built. They are essential in two situations:
While most sliding glass door track heights are in the three standard height ranges offered, some are not. In those cases, we can build a Thermo Panel 3e in a custom height to fit your specific dimension.
The second situation is when you have a side-sliding window. A sliding window is essentially a miniature sliding glass door, and you can install a custom height panel, provided the window track is at least 1" wide.
 Difficulty
Easy
Difficulty
Easy
 Steps
09
Steps
09
 Time Required
0.5 hours
Time Required
0.5 hours
 Sections
02
Sections
02
 Flags
02
Flags
02
Please read instructions & notes thoroughly before installation.


Install the pet door panel


 Difficulty
Easy
Steps
11
Time Required
0.5 hours
Difficulty
Easy
Steps
11
Time Required
0.5 hours
 Sections
03
Flags
02
Sections
03
Flags
02
Please read instructions & notes thoroughly before installation.


Install the pet door panel


Since you cannot lock your sliding door to your panel pet door, we have provided you with alternative locking methods to secure your home:
Installing the sliding door clamp: This clamp has a screw that tightens by hand to prevent the sliding door from moving beyond the clamp’s placement. For doors manufactured with the glass slider on the inside track, the lock can usually be installed on the door’s raised track.
If you aren’t able to use the lock that comes with the panel: A great alternative to locking your sliding glass door is a Charley bar or dowel in the track. Both work off the same concept – they block the slider from opening. When engaged you cannot pull the sliding door away from the pet door panel.

Semi-Permanent Installation:
You might choose to secure the panel in your track with screws. This can be done by drilling screws at an angle in the top and bottom tracks. We recommend doing this from the outside to minimize damage to the sliding glass door frame. One-way screws will prevent tampering or removal of the panel from the outside.

Stationary Panel:
Some stationary sliding door panels can be unfastened and moved over to one side so that you can install the pet door panel between the jamb and stationary panel.
Avoid damaging your sliding glass door by checking that your door can move and that you can reinstall it properly before trying to uninstall the unit.
You will still lose space in your slider to move through, however, you will be able to use your existing sliding door lock to secure your home. Installing your pet door this way is also great in that you already have an alarm system in place.
If your sliding glass door slides on the outside track, using an alternative lock might not be possible, so this allows you to still lock your door.
NOTE: You can do the stationary panel install with the regular spring actuator method--no need to screw it in.
What if my panel is slightly too tall?
The spring-loaded adjustment piece at the top can be trimmed by up to 3/4". Remove the piece using a Phillips-head screwdriver, and shorten the flanges with a hacksaw or suitable tool. To maintain proper panel installation, do not exceed a 3/4" trim.
What if my panel is slightly too short?
Height extension pieces are available, adding 3/4" to the top of the panel that slides into the upper channel. These extensions are made from matching aluminum for consistent color.
For those DIY enthusiasts requiring extensions beyond 3/4", you have the flexibility to create your own using readily available 1-inch nominal wood, which measures 3/4" thick. A 1x3 piece provides a practical and cost-effective solution.
For a clean fit, cut your DIY extension to match the panel's width, then slide it into the top channel. A matching paint job will blend it seamlessly with your frame. To ensure stability, especially with larger extensions, secure it with screws.
What if hardware for the locking latch is preventing the door from sealing properly?
You may be able to remove the hardware, as it is sometimes secured with just a few screws.
If removal isn't possible, try installing the panel on the stationary side, as described here.
If neither option works, you can shim the panel to align it with the lock face. Depending on how far it protrudes, consider using thicker foam weatherstripping or a small wood spacer between the panel and the wall jamb.
My slider isn't closing evenly against the panel?
If your slider isn't level—a common issue in older homes—you may be able to adjust the wheels to realign it. Most doors have an adjustment screw near the bottom that allows you to raise or lower the wheels slightly.

If the slider is level but still misaligned, the issue could be with the metal height adjustment lock at the top of the panel. In some cases, you can use a rubber mallet to straighten out any slight curves.
If the height adjustment lock is hitting the edge, it may indicate that the bottom of the panel is seating deeper into the jamb than the top, creating a widening gap as you move downward. To correct this, use wood shims or weatherstripping in the jamb to push the bottom of the panel outward.
What if the panel is wobbling slightly back and forth?
If your track is wider than 1" you can use small wooden shims or extra weatherstripping to fill in the gap inside the top and bottom tracks. By placing the material inside the tracks you won't be able to see it, but it will stabilize the panel. You might also try semi-permanently installing the pet door.
The slider is on the outside track? How do I lock it?
If you're trying to lock the door, this can be an issue since a clamp lock, Charley bar, or dowel in the track may not work effectively. In this case, a foot lock is a good alternative, though it requires drilling into the front end of the stationary panel frame and a small hole in the sliding door frame.
Depending on your slider's handle design, you might be able to position a Charley bar between the handle and the edge of the stationary panel. This would allow the slider to press against the pet door, preventing it from being opened.
Alternatively, consider installing the pet door between the stationary glass and the wall for added security.
My pet is having difficulty with the large step-down going out or coming in.
In this case, you can use a ramp or small steps to reduce the height of the drop. Ensure that the distance between the top of the flap and the ground is enough for your pet to pass through comfortably without ducking or brushing against their back.
What if I have an alarm system?
The alarm company might be able to come out and move the sensor for you. So instead of one part being on the door and the other on the jamb, you would end up having one side on the panel that matched up with the one on the sliding door.
As there are many different types of alarm configurations we would recommend that you always consult the alarm security company first to discuss your options.
|
Does this dog door insert panel work with vinyl sliders? Yes, the Endura Flap Thermo Panel 3e will work for vinyl sliding glass door so long as the track is at least 1" thick. However, for a snug fit and aesthetic look in your vinyl slider track, we carry the Vinyl Sliding Glass Pet Door as well. Read about the differences between vinyl and aluminum pet door panels here. |
|
Will a custom-made panel still have a spring-loaded design? Yes. The Thermo Panel 3e is built with a 3" spring-loaded height adjustment. When you order in one of the custom height ranges, you will be prompted for your track height. The patio panel will be built to a height that is approximately in the middle of this 3" range. For example, if you specify 40", your panel will be built to adjust from about 38" to 41" tall. We also have a sliding door pet door extension for cases where the panel may be slightly too short for their slider door tracks. |
|
How long will my custom panel take to ship? The glass units for custom height orders are made to order, and take one to two weeks for delivery from the tempering plant. Once we receive the glass, it will take about another week to build your panel. Delivery will take 2-3 weeks depending upon your location. Please reach out to our customer service team for a more precise estimate. |
|
How do I measure my door to get the correct height adjustment size? Measure from the innermost part of the bottom track to the innermost top part of the track. If there is a pencil railing, include that in the measurement as the panel straddles the railing. |
|
Does the Endura Flap Pet Door Thermo Panel 3e require tools for installation? You'll need a flathead screwdriver to adjust the top piece. Panels that ship in two pieces (sectionals) will need to be assembled with 4 hex screws and a hex wrench, all of which are provided for sectionals. The following panels ship in one piece: Panels under 80-1/4" with a Small, Medium, or Large flap. The following panels ship in two pieces: Panels over 80-1/4" with a Small, Medium, Large, or Extra-Large flap and panels under 80-1/4" with an Extra-Large flap. Shipping a tall and/or wide panel in two pieces saves customers on shipping costs since it can be shipped in a smaller box. |
|
Can an intruder remove the sliding glass dog door panel from the outside? No, the thumbscrews are on the interior side of the sliding door pet door panel. Once installed, the Endura Flap Panel can't be removed without first loosening the thumbscrews from inside the home. |
|
Is this sliding glass doggie door good in a cold winter climate? I want something effective in our winter months. Yes, the flap on all of our Endura Flap Pet Door for Sliding Glass Doors has been tested at -40°F and it withstands winds up to 50mph. The dual-pane glass is excellent for keeping your home insulated. |
|
What Is the Step-Over? The step-over is the part of the sliding glass door dog door insert panel under the actual flap opening. Depending on the flap size purchased, the step-over can range from 3" to 7", with larger flaps having an adjustable step-over range. |
|
How thick is the sliding door dog door insert panel? The Endura Flap Sliding Glass Door Thermo Panel 3e is 1" thick. |
|
What locking mechanism can I use for the Thermo Panel 3e? This Endura pet door comes with a C-clamp lock. Alternatively, a wooden dowel, sliding door bar, or Charley Bar can be used for additional security. |
|
Will there be enough room for me to get through after the panel is installed? The sliding glass door doggie door panel will take up some space in your sliding door track. See the "Overall Panel Width" column in the size chart. This gives the width of the panel, which is the amount of space that will be taken up. |
|
My sliding door track has a triangular guide rail. Will this pet door still work? Some sliding glass door tracks have a triangle-shaped guide rail instead of a cylindrical pencil rail running along the middle. This pet door panel has an arch along the bottom that is designed to sit on top of a cylindrical pencil rail. Pencil rails are shorter in height than triangular guide rails, which means that the pet door panel would wobble on top of it rather than sitting flush with the rest of the track. To accommodate the pet door panel, you will need to build up the sides of the triangular guide rail so that the tip is less than 1/4” tall. Please reach out to customer service if you have any questions about this process. |
|
Will this panel work if my sliding glass door has a buried track? Some sliding glass doors have buried tracks. Since this panel has an arch along the bottom that is designed to sit on top of a pencil rail, it will not be secure in a slider with a buried track without modifications. We recommend securing the panel to the track wall with L brackets or toenailing it to the track wall. Toenailing is the process of fastening the panel to the track by driving a nail at roughly a 45-degree angle into the panel and through the track wall. Please note that these modifications result in a semi-permanent installation. If you needed to remove the panel in the future you would first have to remove the L brackets or nails. Additionally, please note that this process would leave holes in the pet door panel and it would no longer be returnable. Please reach out to customer service to further discuss your options for a buried track. |
|
I have a hurricane patio door. Will this pet door work for me? Hurricane door track styles vary widely, so they are case-by-case. Please reach out to customer service to discuss your pet door options for your sliding door. |
|
Will this pet door work with Anderson and Pella sliding doors? Anderson and Pella sliding glass doors have an inner track wall but no outer track wall. Additionally, the pencil rail is on the outer edge of the track rather than in the middle. Since this pet door panel is designed to sit between two track walls and on top of a centered pencil rail, it cannot be installed in Anderson or Pella doors without modifications. We recommend building out your track and using L brackets or toenailing to secure the bottom of the panel to the inner track wall. Building out the track means adding a piece of wood or vinyl that is the same height as the pencil rail to the space next to the pencil rail. This creates a flat surface for the pet door panel to sit on. Next, you will need to secure the panel to the track wall. To do this, you can use L brackets or you can toenail the panel into the track wall. Toenailing is the process of fastening the panel to the track by driving a nail at roughly a 45-degree angle into the panel and through the track wall. Please note that these modifications result in a semi-permanent installation. If you needed to remove the panel in the future you would first have to remove the L brackets or nails. Additionally, please note that this process would leave holes in the pet door panel and it would no longer be returnable. Please reach out to customer service to further discuss this process or different options for an Anderson or Pella sliding door. |
|
Can I install this into a window? This panel would be too big for a window, but you can check out some of the pet doors made specifically for windows; such as the Thermo Panel 3e for Cats. |
Endura Flap products have a lifetime warranty against defects in materials and workmanship under standard regular use. Endura Flap® Pet Doors Are 100% Designed, Engineered, and Manufactured in the USA. They are handmade for quality work in San Luis Obispo, California.
We will replace any defective parts at no cost to you. Defective parts may include incorrectly sized flaps, bent or dented frames, or improperly fitted parts.
Customers living outside of the continental United States are responsible for shipping costs as well as duties and taxes (if applicable) for any replacement parts or services covered under the warranty policy regardless of the replacement part or service's original cost.
Important Note:
It works well in stopping drafts. It was easy to install and looks great. Took my dogs about a day to become used to the harder, segmented flap. We replaced a door with a soft rubbery flap that kept tearing and didn’t stop the drafts well. Pricey but built to last!
I would like to thank the staff for being on the ball and working with me . Top notch !!! Having impact glass made it a challenge to get the window to fit correctly . But with a few modifications we got it in and working perfectly . If you have regular sliding glass doors it’s a very simple and easy process to set in . My cat loves it but won’t push the door yet so I tie it up . But the savings from 8”wide to 78” high being open my electric bill is going down around 100 dollars a month . Thank you for your time and service
I installed the door but the brackets that attach the larger top section onto to the bottom flap section do not tighten. The screws do not set firmly allowing the two sections to have a few degrees of wiggle. I watched the video which shows the two pieces already attached. Is the door supposed to be loose at that meeting point?
It is a well made panel, and functions very well. However, the insulation strip was too thin to allow my slider to close a partial air gap. I have a new home with a very nice slider that is aligned very well, but I did have to buy a 1”x1” insulation strip on Amazon and then I had to trim it to fit so it would make up for the slight air gap between my slider and the panel as it was not flush from top to bottom. I then purchase a track lock from Home Depot that you can use your foot to lock and unlock my slider and also to push my slider tight against the insulation strip. Now it is sealed and locked well with no air gap! I am very happy with the results and it was well worth the effort. The company was responsive and easy to work with. They even issued a credit for the cost to the new insulation strip. I would recommend them.
It is a well made panel, and functions very well. However, the insulation strip was too thin to allow my slider to close the air gap. So I did have to buy a 1”x1” insulation strip on Amazon and then trim it to fit so it would make up for the air gap between my slider and the panel. I then purchase a track lock from Home Depot that you can use your foot to lock my slider and also to push my slider tight an against the insulation strip. Now it is sealed and locked well with no air gap! The company was responsive and easy to work with. The even issued a credit for the cost to the new insulation piece. I would recommend them.

6"w x 11"h
The entry way your dog goes through.10 3/16"
How wide your panel is. 3" - 4 1/2"
The distance from the bottom of the panel to the bottom of your flap.8"w x 15"h
The entry way your dog goes through.12 1/4"
How wide your panel is. 3" - 4 1/2"
The distance from the bottom of the panel to the bottom of your flap.10"w x 19"h
The entry way your dog goes through.14 1/4"
How wide your panel is. 3" - 6"
The distance from the bottom of the panel to the bottom of your flap.12"w x 23"h
The entry way your dog goes through.16 3/8”
How wide your panel is. 3" - 6"
The distance from the bottom of the panel to the bottom of your flap.| Flap Size | Flap Dimension | Step Over Range | Overall Panel Width | Recommended Pet Height |
|---|---|---|---|---|
| Small | 6" w x 11" h | 3" - 4-1/2" (ships at 3") | 10-3/16" | 9" - 15" |
| Medium | 8" w x 15" h | 3" - 4-1/2" (ships at 3") | 12-1/4" | 9" - 21" |
| Large | 10" w x 19" h | 3" - 6" (ships at 4.5") | 14-1/4" | 9" - 27" |
| Extra Large | 12" w x 23" h | 3" - 6" (ships at 4.5") | 16-3/8" | 9" - 34" |
Note: Endura Flap is not recommended for kittens or very small dogs.
| Custom Height Minimum & Maximum Heights | ||
|---|---|---|
| Model | Minimum | Maximum |
| Small | 35" | 100" |
| Medium | 42" | 107" |
| Large | 48" | 117" |
| Extra Large | 46" | 123" |
Custom orders are final sale once built. They are essential in two situations:
While most sliding glass door track heights are in the three standard height ranges offered, some are not. In those cases, we can build a Thermo Panel 3e in a custom height to fit your specific dimension.
The second situation is when you have a side-sliding window. A sliding window is essentially a miniature sliding glass door, and you can install a custom height panel, provided the window track is at least 1" wide.
Difficulty
Easy
Steps
09
Time Required
0.5 hours
Sections
02
Flags
02
Please read instructions & notes thoroughly before installation.
Install the pet door panel
Difficulty
Easy
Steps
11
Time Required
0.5 hours
Sections
03
Flags
02
Please read instructions & notes thoroughly before installation.
Install the pet door panel
Since you cannot lock your sliding door to your panel pet door, we have provided you with alternative locking methods to secure your home:
Installing the sliding door clamp: This clamp has a screw that tightens by hand to prevent the sliding door from moving beyond the clamp’s placement. For doors manufactured with the glass slider on the inside track, the lock can usually be installed on the door’s raised track.
If you aren’t able to use the lock that comes with the panel: A great alternative to locking your sliding glass door is a Charley bar or dowel in the track. Both work off the same concept – they block the slider from opening. When engaged you cannot pull the sliding door away from the pet door panel.
Semi-Permanent Installation:
You might choose to secure the panel in your track with screws. This can be done by drilling screws at an angle in the top and bottom tracks. We recommend doing this from the outside to minimize damage to the sliding glass door frame. One-way screws will prevent tampering or removal of the panel from the outside.
Stationary Panel:
Some stationary sliding door panels can be unfastened and moved over to one side so that you can install the pet door panel between the jamb and stationary panel.
Avoid damaging your sliding glass door by checking that your door can move and that you can reinstall it properly before trying to uninstall the unit.
You will still lose space in your slider to move through, however, you will be able to use your existing sliding door lock to secure your home. Installing your pet door this way is also great in that you already have an alarm system in place.
If your sliding glass door slides on the outside track, using an alternative lock might not be possible, so this allows you to still lock your door.
NOTE: You can do the stationary panel install with the regular spring actuator method--no need to screw it in.
What if my panel is slightly too tall?
The spring-loaded adjustment piece at the top can be trimmed by up to 3/4". Remove the piece using a Phillips-head screwdriver, and shorten the flanges with a hacksaw or suitable tool. To maintain proper panel installation, do not exceed a 3/4" trim.
What if my panel is slightly too short?
Height extension pieces are available, adding 3/4" to the top of the panel that slides into the upper channel. These extensions are made from matching aluminum for consistent color.
For those DIY enthusiasts requiring extensions beyond 3/4", you have the flexibility to create your own using readily available 1-inch nominal wood, which measures 3/4" thick. A 1x3 piece provides a practical and cost-effective solution.
For a clean fit, cut your DIY extension to match the panel's width, then slide it into the top channel. A matching paint job will blend it seamlessly with your frame. To ensure stability, especially with larger extensions, secure it with screws.
What if hardware for the locking latch is preventing the door from sealing properly?
You may be able to remove the hardware, as it is sometimes secured with just a few screws.
If removal isn't possible, try installing the panel on the stationary side, as described here.
If neither option works, you can shim the panel to align it with the lock face. Depending on how far it protrudes, consider using thicker foam weatherstripping or a small wood spacer between the panel and the wall jamb.
My slider isn't closing evenly against the panel?
If your slider isn't level—a common issue in older homes—you may be able to adjust the wheels to realign it. Most doors have an adjustment screw near the bottom that allows you to raise or lower the wheels slightly.
If the slider is level but still misaligned, the issue could be with the metal height adjustment lock at the top of the panel. In some cases, you can use a rubber mallet to straighten out any slight curves.
If the height adjustment lock is hitting the edge, it may indicate that the bottom of the panel is seating deeper into the jamb than the top, creating a widening gap as you move downward. To correct this, use wood shims or weatherstripping in the jamb to push the bottom of the panel outward.
What if the panel is wobbling slightly back and forth?
If your track is wider than 1" you can use small wooden shims or extra weatherstripping to fill in the gap inside the top and bottom tracks. By placing the material inside the tracks you won't be able to see it, but it will stabilize the panel. You might also try semi-permanently installing the pet door.
The slider is on the outside track? How do I lock it?
If you're trying to lock the door, this can be an issue since a clamp lock, Charley bar, or dowel in the track may not work effectively. In this case, a foot lock is a good alternative, though it requires drilling into the front end of the stationary panel frame and a small hole in the sliding door frame.
Depending on your slider's handle design, you might be able to position a Charley bar between the handle and the edge of the stationary panel. This would allow the slider to press against the pet door, preventing it from being opened.
Alternatively, consider installing the pet door between the stationary glass and the wall for added security.
My pet is having difficulty with the large step-down going out or coming in.
In this case, you can use a ramp or small steps to reduce the height of the drop. Ensure that the distance between the top of the flap and the ground is enough for your pet to pass through comfortably without ducking or brushing against their back.
What if I have an alarm system?
The alarm company might be able to come out and move the sensor for you. So instead of one part being on the door and the other on the jamb, you would end up having one side on the panel that matched up with the one on the sliding door.
As there are many different types of alarm configurations we would recommend that you always consult the alarm security company first to discuss your options.
|
Does this dog door insert panel work with vinyl sliders? Yes, the Endura Flap Thermo Panel 3e will work for vinyl sliding glass door so long as the track is at least 1" thick. However, for a snug fit and aesthetic look in your vinyl slider track, we carry the Vinyl Sliding Glass Pet Door as well. Read about the differences between vinyl and aluminum pet door panels here. |
|
Will a custom-made panel still have a spring-loaded design? Yes. The Thermo Panel 3e is built with a 3" spring-loaded height adjustment. When you order in one of the custom height ranges, you will be prompted for your track height. The patio panel will be built to a height that is approximately in the middle of this 3" range. For example, if you specify 40", your panel will be built to adjust from about 38" to 41" tall. We also have a sliding door pet door extension for cases where the panel may be slightly too short for their slider door tracks. |
|
How long will my custom panel take to ship? The glass units for custom height orders are made to order, and take one to two weeks for delivery from the tempering plant. Once we receive the glass, it will take about another week to build your panel. Delivery will take 2-3 weeks depending upon your location. Please reach out to our customer service team for a more precise estimate. |
|
How do I measure my door to get the correct height adjustment size? Measure from the innermost part of the bottom track to the innermost top part of the track. If there is a pencil railing, include that in the measurement as the panel straddles the railing. |
|
Does the Endura Flap Pet Door Thermo Panel 3e require tools for installation? You'll need a flathead screwdriver to adjust the top piece. Panels that ship in two pieces (sectionals) will need to be assembled with 4 hex screws and a hex wrench, all of which are provided for sectionals. The following panels ship in one piece: Panels under 80-1/4" with a Small, Medium, or Large flap. The following panels ship in two pieces: Panels over 80-1/4" with a Small, Medium, Large, or Extra-Large flap and panels under 80-1/4" with an Extra-Large flap. Shipping a tall and/or wide panel in two pieces saves customers on shipping costs since it can be shipped in a smaller box. |
|
Can an intruder remove the sliding glass dog door panel from the outside? No, the thumbscrews are on the interior side of the sliding door pet door panel. Once installed, the Endura Flap Panel can't be removed without first loosening the thumbscrews from inside the home. |
|
Is this sliding glass doggie door good in a cold winter climate? I want something effective in our winter months. Yes, the flap on all of our Endura Flap Pet Door for Sliding Glass Doors has been tested at -40°F and it withstands winds up to 50mph. The dual-pane glass is excellent for keeping your home insulated. |
|
What Is the Step-Over? The step-over is the part of the sliding glass door dog door insert panel under the actual flap opening. Depending on the flap size purchased, the step-over can range from 3" to 7", with larger flaps having an adjustable step-over range. |
|
How thick is the sliding door dog door insert panel? The Endura Flap Sliding Glass Door Thermo Panel 3e is 1" thick. |
|
What locking mechanism can I use for the Thermo Panel 3e? This Endura pet door comes with a C-clamp lock. Alternatively, a wooden dowel, sliding door bar, or Charley Bar can be used for additional security. |
|
Will there be enough room for me to get through after the panel is installed? The sliding glass door doggie door panel will take up some space in your sliding door track. See the "Overall Panel Width" column in the size chart. This gives the width of the panel, which is the amount of space that will be taken up. |
|
My sliding door track has a triangular guide rail. Will this pet door still work? Some sliding glass door tracks have a triangle-shaped guide rail instead of a cylindrical pencil rail running along the middle. This pet door panel has an arch along the bottom that is designed to sit on top of a cylindrical pencil rail. Pencil rails are shorter in height than triangular guide rails, which means that the pet door panel would wobble on top of it rather than sitting flush with the rest of the track. To accommodate the pet door panel, you will need to build up the sides of the triangular guide rail so that the tip is less than 1/4” tall. Please reach out to customer service if you have any questions about this process. |
|
Will this panel work if my sliding glass door has a buried track? Some sliding glass doors have buried tracks. Since this panel has an arch along the bottom that is designed to sit on top of a pencil rail, it will not be secure in a slider with a buried track without modifications. We recommend securing the panel to the track wall with L brackets or toenailing it to the track wall. Toenailing is the process of fastening the panel to the track by driving a nail at roughly a 45-degree angle into the panel and through the track wall. Please note that these modifications result in a semi-permanent installation. If you needed to remove the panel in the future you would first have to remove the L brackets or nails. Additionally, please note that this process would leave holes in the pet door panel and it would no longer be returnable. Please reach out to customer service to further discuss your options for a buried track. |
|
I have a hurricane patio door. Will this pet door work for me? Hurricane door track styles vary widely, so they are case-by-case. Please reach out to customer service to discuss your pet door options for your sliding door. |
|
Will this pet door work with Anderson and Pella sliding doors? Anderson and Pella sliding glass doors have an inner track wall but no outer track wall. Additionally, the pencil rail is on the outer edge of the track rather than in the middle. Since this pet door panel is designed to sit between two track walls and on top of a centered pencil rail, it cannot be installed in Anderson or Pella doors without modifications. We recommend building out your track and using L brackets or toenailing to secure the bottom of the panel to the inner track wall. Building out the track means adding a piece of wood or vinyl that is the same height as the pencil rail to the space next to the pencil rail. This creates a flat surface for the pet door panel to sit on. Next, you will need to secure the panel to the track wall. To do this, you can use L brackets or you can toenail the panel into the track wall. Toenailing is the process of fastening the panel to the track by driving a nail at roughly a 45-degree angle into the panel and through the track wall. Please note that these modifications result in a semi-permanent installation. If you needed to remove the panel in the future you would first have to remove the L brackets or nails. Additionally, please note that this process would leave holes in the pet door panel and it would no longer be returnable. Please reach out to customer service to further discuss this process or different options for an Anderson or Pella sliding door. |
|
Can I install this into a window? This panel would be too big for a window, but you can check out some of the pet doors made specifically for windows; such as the Thermo Panel 3e for Cats. |
Endura Flap products have a lifetime warranty against defects in materials and workmanship under standard regular use. Endura Flap® Pet Doors Are 100% Designed, Engineered, and Manufactured in the USA. They are handmade for quality work in San Luis Obispo, California.
We will replace any defective parts at no cost to you. Defective parts may include incorrectly sized flaps, bent or dented frames, or improperly fitted parts.
Customers living outside of the continental United States are responsible for shipping costs as well as duties and taxes (if applicable) for any replacement parts or services covered under the warranty policy regardless of the replacement part or service's original cost.
Important Note:
It works well in stopping drafts. It was easy to install and looks great. Took my dogs about a day to become used to the harder, segmented flap. We replaced a door with a soft rubbery flap that kept tearing and didn’t stop the drafts well. Pricey but built to last!
I would like to thank the staff for being on the ball and working with me . Top notch !!! Having impact glass made it a challenge to get the window to fit correctly . But with a few modifications we got it in and working perfectly . If you have regular sliding glass doors it’s a very simple and easy process to set in . My cat loves it but won’t push the door yet so I tie it up . But the savings from 8”wide to 78” high being open my electric bill is going down around 100 dollars a month . Thank you for your time and service
I installed the door but the brackets that attach the larger top section onto to the bottom flap section do not tighten. The screws do not set firmly allowing the two sections to have a few degrees of wiggle. I watched the video which shows the two pieces already attached. Is the door supposed to be loose at that meeting point?
It is a well made panel, and functions very well. However, the insulation strip was too thin to allow my slider to close a partial air gap. I have a new home with a very nice slider that is aligned very well, but I did have to buy a 1”x1” insulation strip on Amazon and then I had to trim it to fit so it would make up for the slight air gap between my slider and the panel as it was not flush from top to bottom. I then purchase a track lock from Home Depot that you can use your foot to lock and unlock my slider and also to push my slider tight against the insulation strip. Now it is sealed and locked well with no air gap! I am very happy with the results and it was well worth the effort. The company was responsive and easy to work with. They even issued a credit for the cost to the new insulation strip. I would recommend them.
It is a well made panel, and functions very well. However, the insulation strip was too thin to allow my slider to close the air gap. So I did have to buy a 1”x1” insulation strip on Amazon and then trim it to fit so it would make up for the air gap between my slider and the panel. I then purchase a track lock from Home Depot that you can use your foot to lock my slider and also to push my slider tight an against the insulation strip. Now it is sealed and locked well with no air gap! The company was responsive and easy to work with. The even issued a credit for the cost to the new insulation piece. I would recommend them.